All Cables are tested at the factory and at Studio 1 Productions with a Sony RM-VPR1
and a Sony HDR CX440 camcorder prior to shipping.
These cables only work with the Sony Brand Remote Control
units, which are the Sony RM-VPR1 and the Sony VCT-VPR1 tripod remotes.
They are shown below.

If you have a JJC SR-F2 remote or the Revo VRS-Multi remote, we do have extension /
replacement cables for these two controllers.
Please visit this page.
Other 3rd party or aftermarket controllers do not allow the cable to be replaced, as they are hardwired in. Only the
Sony brand, the JJC SR-F2 and the Revo VRS-Multi remote controllers allow the cable to be unplugged at the remote control unit and replaced with our longer cable.
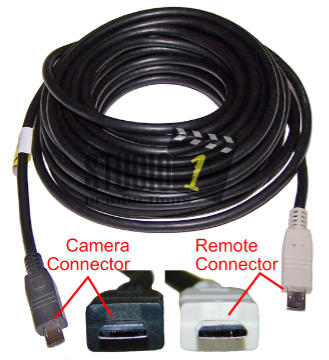
The extension or replacement cables on this page are only for the
Sony RM-VPR1, and the Sony VCT-VPR1. These cables have a male Multiport connector on both ends, allowing you to extend the distances between the remote and the camera.
They are available in
four lengths, 12 ft., 18 ft., 27 ft. and 37 ft. They are heavy duty and made with heavy gauge wires so there will not be any signal loss between the remote and the cameras.
The 37 ft. cable weights one pound as it is a very thick cable, plus it is
completely shielded. NOTE: YOU MUST be careful with the connectors as
they are very tiny and will damage if you are not careful with them. Why Sony went to this type of small fragile connector is beyond me, but you need to
handle them very carefully.
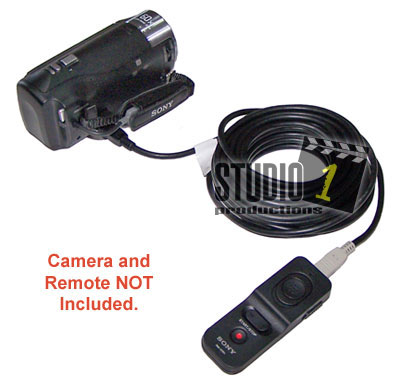
These extension cables are perfect for use with End Zone camera and Sideline camera setups.

Your camera MUST have a Multiport Connection like shown above.
Attention Coaches: While this cable is heavy duty and is perfect for End Zone and Sideline camera setups.
PLEASE warn who ever is setting up and working with the End Zone Camera equipment,
that the connectors are very small and fragile and they must handle them with care. They are NOT rugged like a football.
How to use the Cable
Power the camera OFF when plugging in or unplugging the cable. Or
you may damage the remote controller.
Unplug the cable that came with the the Sony RM-VPR1 or VCT-VPR1 remote controller, as you will be replacing that cable with
one of our 12ft, 18ft, 27 ft. or 37ft. cables.
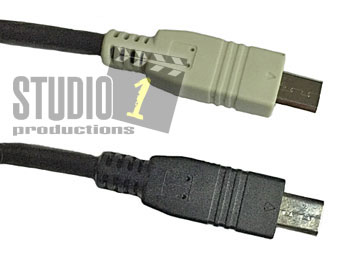
Next, the Grey end of the cable plugs into the remote and the Black end plugs into the camera. We have a label on the cable to remind you
which end plugs into the camera. (NOTE: Do NOT remove the label as it also has the serial number for the cable on the
one side. The serial number is needed for your warranty.)
Make sure you are plugging the cable in the correct way, or you may damage the connector.
When you plug the cable in, you should hear
or feel it click into place. Please make sure the cable is plugged in all the way.
If the remote will not control the camera, then power off the camera
and unplug and replug in both ends of the cable. As they may not
be getting a good connection.
NOTE: When connecting the cable to the camera, you MUST
provide some type of strain relief so the cable is not pulling on the connection especially at the camera end, otherwise you will damage the pins in the connector
or the connector itself. As an example, you might try looping the cable around the camera strap before plugging it into the camera.
I am sorry but we will NOT cover damage like this under the warranty, since this is caused by the end user.
This cable is also called a Sony Multiport extension cable, Sony Multi Terminal Cable or a Sony Multiport replacement cable.
NOTE: While they may look like a USB cable they are NOT. They are made with the 15 pin connector that Sony uses for the Multiport
connection on the video camera and the remote control.
All Cables are Tested with a Sony RM-VPR1 and a Sony HDR CX440 camcorder prior to shipping.
Instructions on how to see the Record Status and Battery Indicator on the External LCD Monitor when connected via the HDMI jack.
1. Open the Sony camera’s LCD screen.
2. Press the menu button
3. On the menu, select Camera/Mic. That will bring up
another menu.
4. Scroll down to “Low Lux” and make sure it is set to OFF
5. Then continue scrolling down to “Scene Selection” and
select that.
6. You will see Icons on the bottom of the screen. Scroll across to the arrow icon, it looks like this >
7. Press
the > icon AND DO NOT PRESS any other buttons.
Do NOT turn the camera off, just plug in the cable for the external LCD monitor.
As long as you leave the camera on and in this setting, you will have the Record
Status on the external LCD Monitor via the HDMI jack. If you power off the camera, you will need to follow these instructions again.
Cable Warnings - PLEASE READ
Power the camera OFF when plugging in
or unplugging the cable. Or you may damage the remote controller.
Plug the Black Connector on the cable into the camera.
Plug the
Grey Connector on the cable into the remote.
Strain
Relief: When connecting the cable to the camera, you
MUST provide some type of strain relief so the cable is not pulling on the connection especially at the camera end, otherwise you will damage the pins in the connector
or the connector itself. As an example, you might try looping the cable around the camera strap before plugging it into the camera.
I am sorry but we will NOT cover damage like this under the warranty, since this is caused by the end user.
Connection Problems
If the cable
is not making a good connection to the camera or remote, you will loose
communication with the remote to camera. If this happens unplug
both ends of the cable and replug them back in. This almost always
fixes the problem. What is happening is the plug at the camera end
(or remote end, but most likely the camera end) is being moved around
slightly and the pins in the connection are loosing contact. To fix this
make sure you have a good strain relief system in place and that the
cable is not loose or able to move.
DO NOT get the connectors wet. There is a small circuit board inside each connector. If it gets wet it will cause the cable to short out. So keep the
cable/connectors off of the ground. We have heard of people dragging the cables through wet grass and the cables not working because water got in the opening on the connectors. So, it is
your responsibility to make anyone handling the cable knows this. If the cable does get wet, coil it up like the picture
up above and laying it out in the warm sun for a day and see if the circuit board can dry out. Most of the time this can fix the problem.
BE CAREFUL
when plugging the cable in. Pay close attention to make sure you are plugging the cable in the correct way or you will damage the pins in the cable.
Major problems coaches have with this cable:
Getting the connectors wet or dirt in the connector.
Plugging the cable in incorrectly and damaging the pins in the
connector.
Not providing strain relief for the plug at the camera end.
Other users, such as videographers and photographers don't have these problems.
We have special equipment to look into the connector to see if the pins
have been damaged or if they have gotten wet or if you got dirt in the connector. There will be no return or exchanges allowed, if we find damage that is caused by the end user, as this
is not a failure of the cable.
Please print this page out so you have a copy of the direction on how to use the Sony RM-VPR Multiport Extension cable.
Below is a partial list of camcorders that
work with these cables.
NEW: To see a full list Sony Video Cameras, Camcorders and Cameras, that have the Multiport connection, plus LANC connections and
other remote connections. Click Here
|
FDR-AX30
FDR-AX33
FDR-AX53
FDR-AX100
FDR-AX700
FDR-AXP35
FDR-AXP55
HDR-AX2000
HDR-CX220
HDR-CX230
HDR-CX240
HDR-CX280
HDR-CX290
HDR-CX320
HDR-CX330
HDR-CX380
HDR-CX390
HDR-CX400
HDR-CX405
HDR-CX410
HDR-CX430
HDR-CX440
HDR-CX450
HDR-CX455
HDR-CX480
HDR-CX485
HDR-CX510
HDR-CX625
HDR-CX675
HDR-CX800
HDR-CX900
HDR-GW66
HDR-GWP88
|
HDR-PJ220
HDR-PJ230
HDR-PJ240
HDR-PJ270
HDR-PJ275
HDR-PJ280
HDR-PJ320
HDR-PJ330
HDR-PJ340
HDR-PJ350
HDR-PJ380
HDR-PJ390
HDR-PJ410
HDR-PJ420
HDR-PJ430
HDR-PJ440
HDR-PJ510
HDR-PJ530
HDR-PJ540
HDR-PJ650
HDR-PJ660
HDR-PJ670
HDR-PJ675
HDR-PJ680
HDR-PJ780
HDR-PJ790
HDR-PJ810
HDR-PJ820
HXR-NX80
PXW-X70
PXW-Z90
DEV-50
|
Plus, any other camera that works with the Sony RM-VPR1, Sony VCT-VPR1 or Sony VCT-VPR100. This including Sony DSLR cameras.
For other Sony Cameras, such as the NEX, SLT and Cyber-shot cameras, we have compiled a list of cameras that will work
with the Sony RM-VPR1 remote.
You can find that list by clicking here.
NOTE: There is a label on the Sony RM-VPR1 extension cable showing which end plugs into the video camera. This label also has the
serial number for the cable. Do not remove this label as we need the serial number for warranty purposes. If you remove the label with
the serial number then the warranty will be voided.