Note: This article is best read on a desktop computer or a tablet due to all of the charts that are in
this article. Trying to read this article on a cell phone, might be too difficult since the charts are kind of large in size.
This article is part of our Video Cards for Adobe Premiere article. (If
you click on the link, it will open in a separate window, so you wont' loose your place here).
This part of the article will concentrate solely on the results you will get when using the Premiere Benchmark Projects results and a Real
Premiere Project. We will explore the differences and why the results vary so greatly.
The very first thing I want to point out is, the results you get when you run a Premiere Benchmark Project are not going to translate over
to a real world project that you will be working with. Unless, your project is is nothing but GPU effects and GPU transitions.
Let's jump right in and take a look at what I mean by the results will vary so greatly.
Below are the actual results between the GTX-660 and the GTX-780.
| Video Card |
Project for the test |
Time it took to render the Timeline |
| GTX-660 |
Premiere Benchmark Project |
58 seconds |
| GTX-780 |
Premiere Benchmark Project |
22 seconds |
Not bad... That is quite an improvement. Makes you want to upgrade your video card doesn't it?
But, hold on there..... Let's take a look at the results of when we used a real world Premiere project.
| Video Card |
Project for the test |
Time it took to render the Timeline |
| GTX-660 |
A Real Premiere Project |
150 seconds |
| GTX-780 |
A Real Premiere Project |
146 seconds |
Okay, what the heck is going on here? We used the same two video cards in the same computer. The Premiere
Benchmark Project showed us a 36 second improvement when going from the GTX-660 to the GTX-780. However, the when we used a Real
Premiere Project, there was only a 4 second improvement.
Confused.... Don't be. I will explain what is going with these test results and all of the other test results in this article.
One thing I want to say right up front, DO NOT get all caught up in the Premiere Benchmark results numbers, they DO NOT represent real world
performance that you and I will get with our normal Premiere Projects.
You may see some posts online like this one, "I just upgrade my video card from a GTX-560 Ti to a GTX-760 and I am rendering twice
as fast now."
Another person might post, “I just upgraded my video card from a GTX-560 Ti to a GTX-760 and I am not seeing any difference with
rendering or exporting my videos. What is going on?”
What's going on is....
It depends on how the person tested their video card. On the online forums most people are testing their video cards with a Premiere
Benchmark Project. These Benchmark Projects are loaded with GPU effects and GPU transitions stack on top of each other for the length
of the project. With the Premiere Benchmark Projects, the CPU is hardly used. The person who saw a huge performance increase had
to have been testing it with the Premiere Benchmark Project.
Now the person who made the statement where they didn't see any difference rendering or exporting had to be testing their video cards using
a project they were working on and not a Premiere Benchmark Project.
The reason why is say this is, the Premiere Benchmark Projects are NOT a true representation of a normal timeline that you
and I would be working with. AND, you should NOT expect to see the same type of performance improvement on a real
project’s timeline.
There are a lot of people on the various forums that talk about benchmark numbers and some make video card recommendations base on these
numbers. Now that is fine, if we were all only ever going to run the benchmark programs, with the GPU effects and GPU transitions
filling up the timeline. But, we are working with real projects where GPU effects are NOT filling up the entire timeline. So
the results of the benchmark projects are not even close to what you should expect with a real world project.
A little farther down in this article I will show you a picture of the Premiere Benchmark project's timeline and a picture of a real Premiere
project's timeline, so you can see how the benchmark project is loaded with GPU effects and GPU transitions. In addition, you can see
what a real project's timeline looks like. (A lot less GPU usage)
Please, don’t get me wrong, I am not knocking these Premiere benchmark tests. They do have their place. For
example, when comparing the difference between a GTX-780 and a GTX-980 in the same computer, I would use the benchmark project to push each
video card hard, so I can see how much of a performance difference there is going to be between the video cards with heavy GPU usage in the
same computer. But, I wouldn't expect that to translate over to a real Premiere project. It's simply for testing or benchmarking
the difference between the video cards.
If I used a real world Premiere project, I probably won’t see any difference, but when using a Premiere benchmark project, I would end up
seeing a few seconds difference between the two video cards.
There are a lot of benchmark tests out there for video cards. Most of them have to do with benchmarking video games or some 3D
program. Benchmarking video cards with games will NOT translate over to for someone using Premiere. So please
disregard the benchmark tests where they used video games to test the video cards. They are not representative of how Premiere will be using the video card.
While you made read how the different architecture on the different version of card make a different in performance, this is mainly for games
when they talk about this and not for video editing software. So please keep that in mind.
Accelerated GPU Effects and GPU Transitions
Below is a list of GPU accelerated effects, transition and features in Adobe Premiere CC 2014.
All other effects, transitions and features are handled by the CPU only.
| GPU Accelerated Presets |
|
|
|
|
| Fast Blur In |
Mosaic In |
|
|
|
| Fast Blur Out |
Mosaic Out |
|
|
|
|
PIP (Picture in Picture) |
|
|
|
|
|
|
|
|
| GPU Video Effects |
|
|
|
|
| Alpha Adjust |
Crop |
Four-Point Garbage Matte |
Luma Curve |
Sixteen-Point Garbage Matte |
| Basic 3D |
Directional Blur |
Gamma Correction |
Lumetri |
Three-way Color Corrector |
| Black & White |
Drop Shadow |
Garbage Matte (4, 8, 16) |
Mosaic |
Timecode |
| Brightness & Contrast |
Edge Feather |
Gaussian Blur |
Noise |
Tint |
| Clip Names |
Eight-Point Garbage Matte |
Horizontal Flip |
Proc Amp |
Track Matte Key |
| Color Balance (RGB) |
Extract |
Invert |
RGB Curves |
Ultra Keyer |
| Color Pass (Windows only) |
Fast Blur |
Levels |
RGB Color Corrector |
Video Limiter |
| Color Replace |
Fast Color Corrector |
Luma Corrector |
Sharpen |
Vertical Flip |
| Warp Stabilizer |
|
|
|
|
|
|
|
|
|
| GPU Video Transitions |
|
|
|
|
| Additive Dissolve |
Directional Blur |
Push |
|
|
| Cross Dissolve |
Fast Blur |
Slide |
|
|
| Dip to Black |
Film Dissolve |
Wipe |
|
|
| Dip to White |
Invert |
|
|
|
|
|
|
|
|
| GPU Lumertri Looks |
|
|
|
|
| (Cinematic) |
(Desaturation) |
(Style) |
(Temperature) |
|
| Bleach Bypass 1 |
B&W Blue Filter |
Back in the Day |
Cold Midtones |
|
| Bleach Bypass 2 |
B&W Red Filter |
Dreams |
Cold Mix |
|
| Cinematic 1 |
B&W Yellow Filter |
Dreams 1 |
Cold Overall |
|
| Cinematic 2 |
Maximum Desaturation |
Dreams 2 |
Duo-Toning |
|
| Compression 1 |
Midtones Desaturation |
Seventies 1 |
Warm Gamma Mix |
|
| Compression 2 |
Mixed Desaturation |
Seventies 2 |
Warm Midtones |
|
| Day4Night |
Overlall Desaturation 0.6 |
Sixties 1 |
Warm Overall |
|
| Sepia |
Overall Saturation 1.2 |
Sixties 2 |
|
|
|
|
|
|
|
| GPU Features |
|
|
|
|
| Blending Modes |
|
|
|
|
| Color Space Conversions |
|
|
|
|
| Deinterlacing |
|
|
|
|
| Scaling |
|
|
|
|
The GPU will only be used if you are using one or more of the above effects, transitions or features. Otherwise, only the
CPU is used.
About the Tests I Ran
For out tests, we used a Premiere Benchmark Project and a real work Premiere Project.
We ran both projects on 5 different computer systems (with different CPU's).
We tested 16 videos cards.
Both projects were run 3 times on each card and in each system. Plus, each project was run 1 time in each system with the GPU turned
off, so we could see how long it would take to render using the CPU only.
We did 4 render/export tests per project.
The Test Computers
I tried to level the playing field with all of the computers. First, a couple of the computers only had 16GB of RAM, so I reduced the other computers
to 16GB of RAM, as the amount of RAM can affect the exporting times to some formats.
Next, all of the computers had 3 drives. While a couple of the systems had SSD drives for the C: drive, we left those alone and installed a second and third
drive as 1 TB Western Digital Black hard drives.
None of the CPU’s were over clocked and we turned off all unnecessary background programs on each of the systems.
Here are the CPU’s that I used:
- AMD FX-6300
- AMD FX-8350
- Intel I7-920
- Intel I7-3930
- Intel I7-5930K
This gave us a nice range of CPU’s to work with.
Some people will say, you can't run Premiere with an AMD processors. This is simply NOT true. Are they the fastest CPU's, no.
However, they are not as expensive as Intel CPU's and motherboards. Just take a look at the benchmark results below, you will see the AMD CPU's are
pretty good at least for HD material. Are they the best, no. But, they do work. Now, with 4K material you will need a higher end Intel CPU.
Note: I tried to get a hold of a system with the Intel I7-5960K, however, it was never available to me long
enough for me to test all 16 video cards.
The Benchmark project and Real World project
I used a modified version of the PPBM5 Premiere benchmark project and a 4 minute real project that I was working on. All of the footage in both the
Premiere benchmark project and the real project is HD material. I did not use any 4K material due to the fact that some of the
video cards only had 1 GB of RAM and you will need more than that for 4K.
I used Adobe Premiere CC 2014, the latest version.
The tests I ran were:
- Rendering the timeline with the GPU on and off.
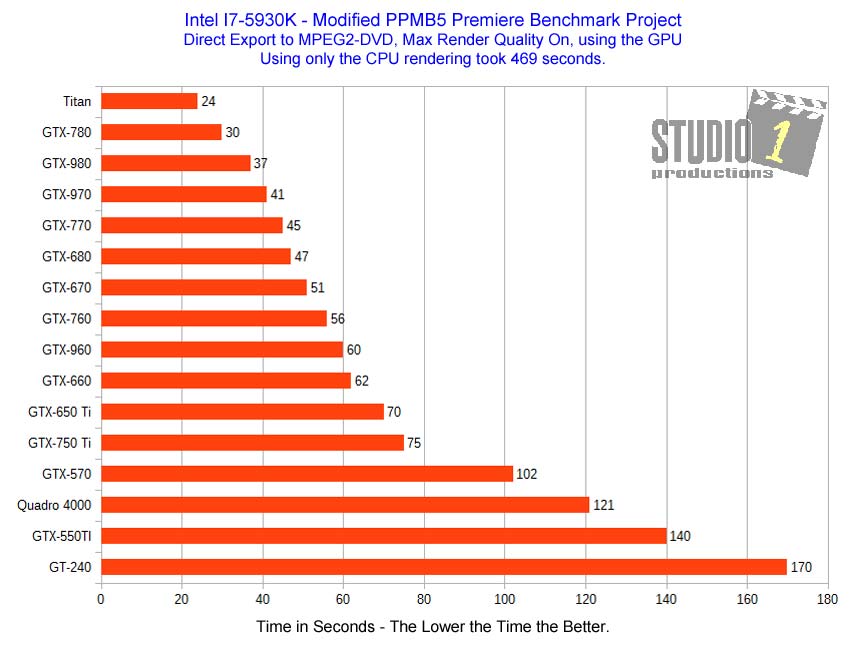
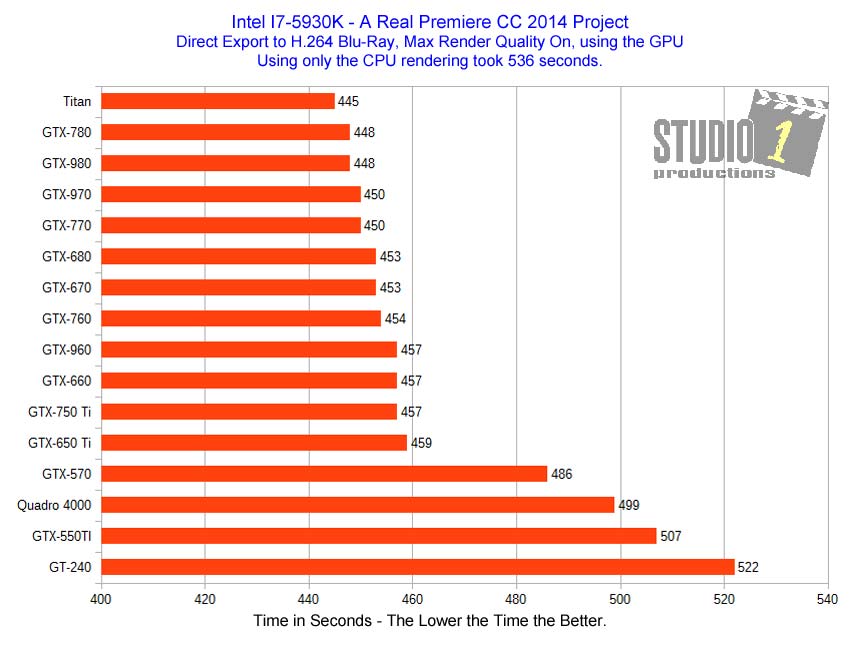
- Directly exporting from Premiere to MPEG2-DVD format, with the GPU on and off.
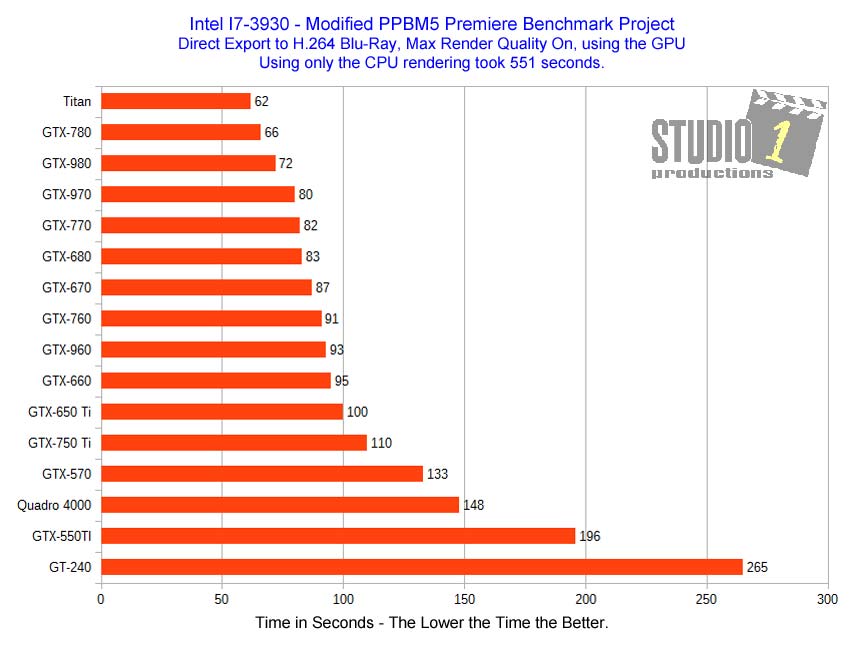
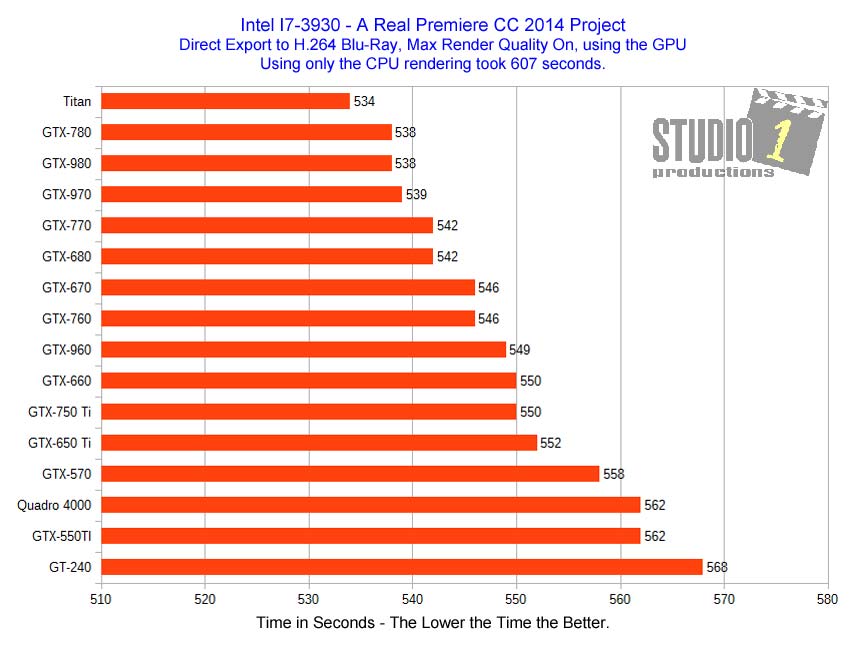
- Directly exporting from Premiere to H.264 BluRay format, with the GPU on and off.
- Directly exporting from Premiere to H.264 .MP4 format, with the GPU on and off.
I did not use the Adobe Media Encoder for any of these test, I directly exported from Premiere.
When I ran the test with the GPU off and using ONLY the CPU for rendering or exporting, I ran that test only once.
However, when I ran each test with the GPU ON, the tests were run 3 times and then the times were average together. The reason for this was, there would
sometime be a couple of seconds difference between each test. By running the test 3 times, this allowed me to get a more accurate rendering or exporting time
of each test.
The Video Cards I Used
All of the video cards had 1GB or more of DDR5 ram. Some of these video cards were factory overclocked. So I reset those video cards back to
the reference specs, so nothing was overclocked. The video card brands were, ASUS, Gigibyte, MSI and PNY.
I used the following video cards for these tests:
- GT-240
- GTX-550 Ti
- GTX-570
- GTX-650 Ti
- GTX-660
- GTX-670
- GTX-680
- GTX-750 Ti
- GTX-760
- GTX-770
- GTX-780
- GTX-960
- GTX-970
- GTX-980
- Quadro 4000
- Titan
Why didn't I use any AMD video cards during this test?
The answer is quite simple... I didn't have any access to any of the AMD video cards. While I own a lot of the video cards on the above list,
some of them I had to borrow. Now, if you would like to see AMD video cards tested, I would happily take donations of your AMD video cards, if
and when you upgrade your video card. Otherwise, I will be sticking with NVidia cards for now.
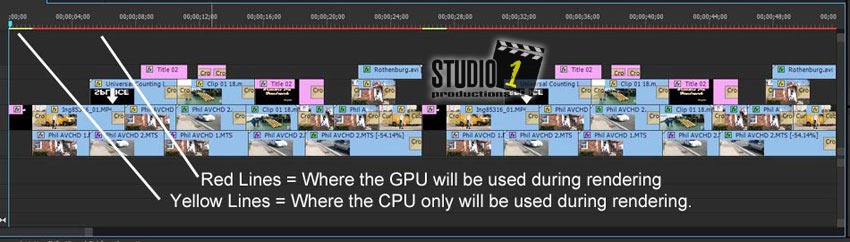
The Timeline of an Adobe Premiere Benchmark Project.
By setting the Mercury Playback Engine to use the CPU, you can get an approximate idea of what the CPU will be handling and what the GPU
could be handling. There is a line at the top of the timeline, as shown below. The parts of the line that are Yellow, the CPU will be
handling. The parts of the line that are Red, the video card's GPU could be handling. As you can see the Premiere benchmark project is
pretty much all a Red line, so the GPU will be used almost all of the time. This is NOT typical of a normal Premiere project, as you would not have
that many GPU effects and GPU transitions piled up like that.
The only thing this is good for is pushing the video hard to see what performance differences there will be between different video cards in the same
computer. However, they are NOT going to represent a real Premiere project in any manor.
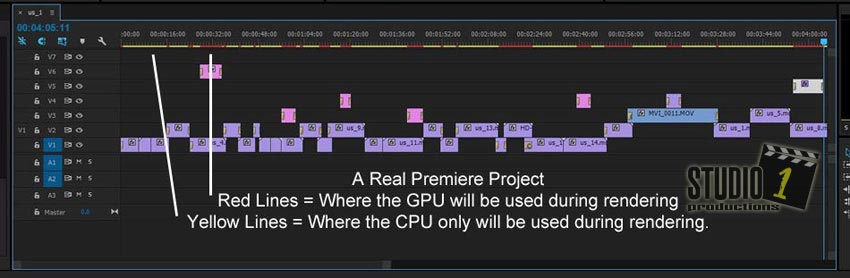
The Timeline of a real Adobe Premiere Project.
In the picture below, I have the Mercury Playback Engine set to CPU, so once again we can see approximately what parts of the timeline will be handled
by the CPU and what parts will be handled by the GPU.
The first thing you are going to notice below, is with the line above the timeline, there is a whole lot more areas that have a Yellow line and there is a
lot less area with the Red line. In a real world Premiere project the CPU is use a lot more than in the benchmark project. This is far more typical
of a timeline that you and I would be working with.
So the results you will see in the charts below for the Real Premiere Project are going to be closer to what you should expect with your own projects.
Try this, set the Mercury Playback Engine in a project you are working on, to CPU. Then take a look at the Red/Yellow line in the timeline area, like
shown above. Most of us will have a lot more Yellow in the line than Red. Indicating that the CPU will be doing most of the work and not
the GPU.
The exception to this is when you are down scaling during an export. For example, if you shot everything in HD and you are going to be making a
Standard Definition MPEG2 DVD, then during the export you will be down scaling all of the footage. In this case, your GPU will be used during the
entire export.
Now, let's say you shot a video in HD and you are going to be exporting an HD video in .mp4 format. Since you are not down scaling, the GPU will
only be used when it comes across a GPU effect or GPU transition, just like when you render the timeline. The rest of the time, the CPU will be
doing all of the work during the export.
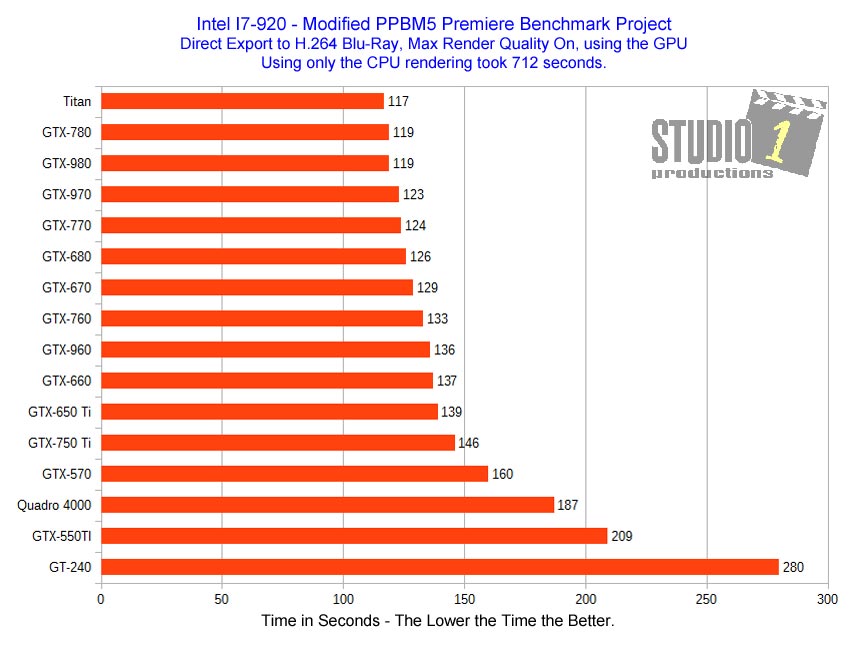
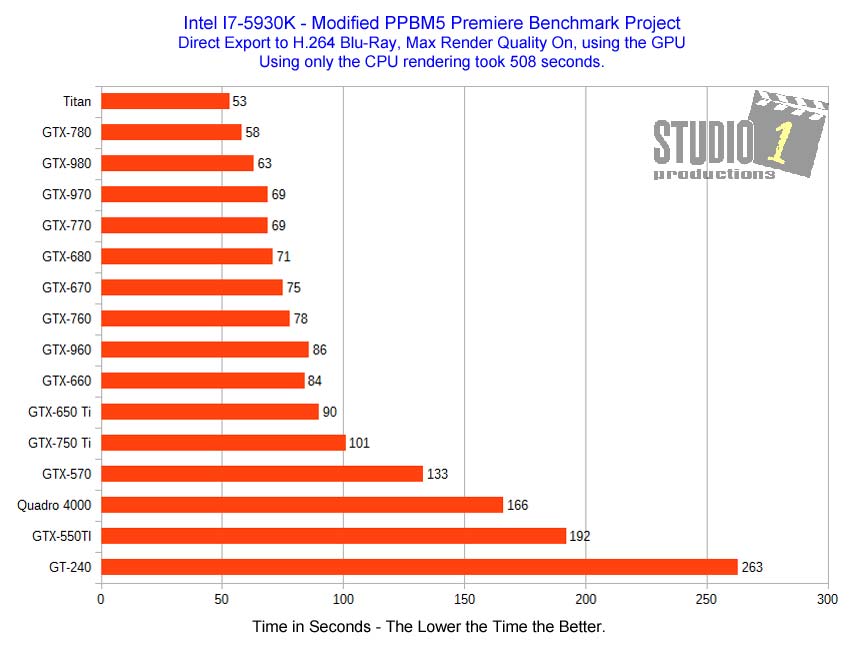
When you look at the charts below, you will see good performance gains between the video cards when you export to a MPEG2
DVD format, but not so much performance gains when you export to an BluRay or an .mp4 file, simply because they are not down scaling.
It's important to remember, not all effects and transitions are handled by the GPU.
Important: If you are doing a lot of color correcting to your video or using a lot of GPU effects and GPU transitions, you
timeline will have more red line areas than yellow. If so, then your results will be closer the the benchmark results, sine the GPU will be used a
lot more. Now, if you timeline has more yellow line areas, then your results will be closer the the Real World Premiere Project that I talk about in this article.
The Test Results
Below are the charts showing the test results. So let's jump in and take a look at them. I will explain things as we go through the charts.
The way the charts are grouped is by CPU and the the type of test that was run.
Here is how the charts are grouped:
| AMD FX-6300 |
Adobe Premiere Benchmark Project |
Rendering the Timeline |
| AMD FX-6300 |
Real Premiere Project |
Rendering the Timeline |
| AMD FX-6300 |
Adobe Premiere Benchmark Project |
Direct Export to MPEG2-DVD |
| AMD FX-6300 |
Real Premiere Project |
Direct Export to MPEG2-DVD |
| AMD FX-6300 |
Adobe Premiere Benchmark Project |
Direct Export to .MP4 |
| AMD FX-6300 |
Real Premiere Project |
Direct Export to .MP4 |
| AMD FX-6300 |
Adobe Premiere Benchmark Project |
Direct Export to h.264 BluRay |
| AMD FX-6300 |
Real Premiere Project |
Direct Export to h.264 BluRay |
|
|
|
| AMD FX-8350 |
Adobe Premiere Benchmark Project |
Rendering the Timeline |
| AMD FX-8350 |
Real Premiere Project |
Rendering the Timeline |
| AMD FX-8350 |
Adobe Premiere Benchmark Project |
Direct Export to MPEG2-DVD |
| AMD FX-8350 |
Real Premiere Project |
Direct Export to MPEG2-DVD |
| AMD FX-8350 |
Adobe Premiere Benchmark Project |
Direct Export to .MP4 |
| AMD FX-8350 |
Real Premiere Project |
Direct Export to .MP4 |
| AMD FX-8350 |
Adobe Premiere Benchmark Project |
Direct Export to h.264 BluRay |
| AMD FX-8350 |
Real Premiere Project |
Direct Export to h.264 BluRay |
|
|
|
And so on with the
Intel I7-920
Intel I7-3930
Intel I7-5930K |
All of the charts are repeated in the same
order and the same test. |
|
Take you time going through them. Notice the rendering times between the Adobe Premiere Benchmark Project and the
Real Premiere Project.
NOTE: There is more to this article after the charts.
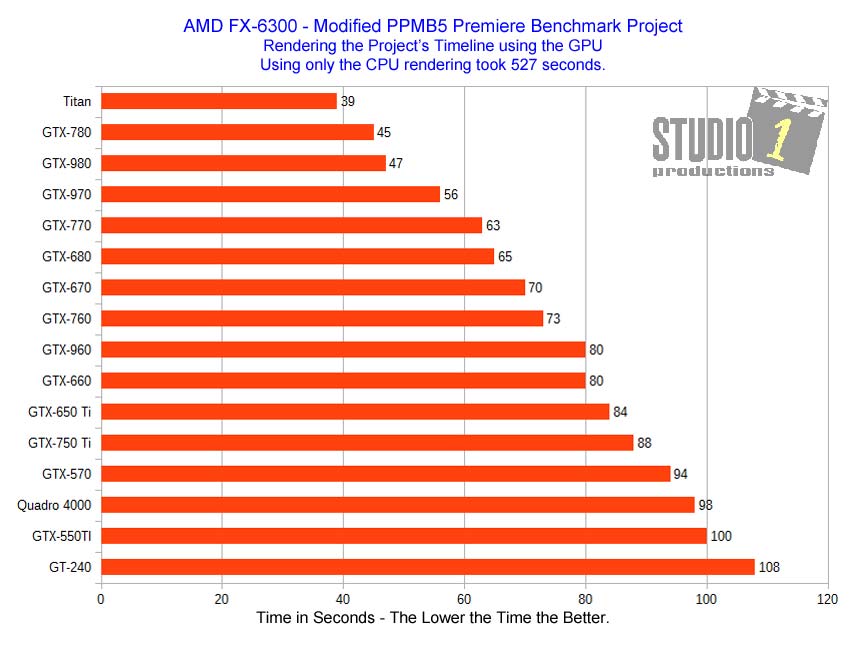
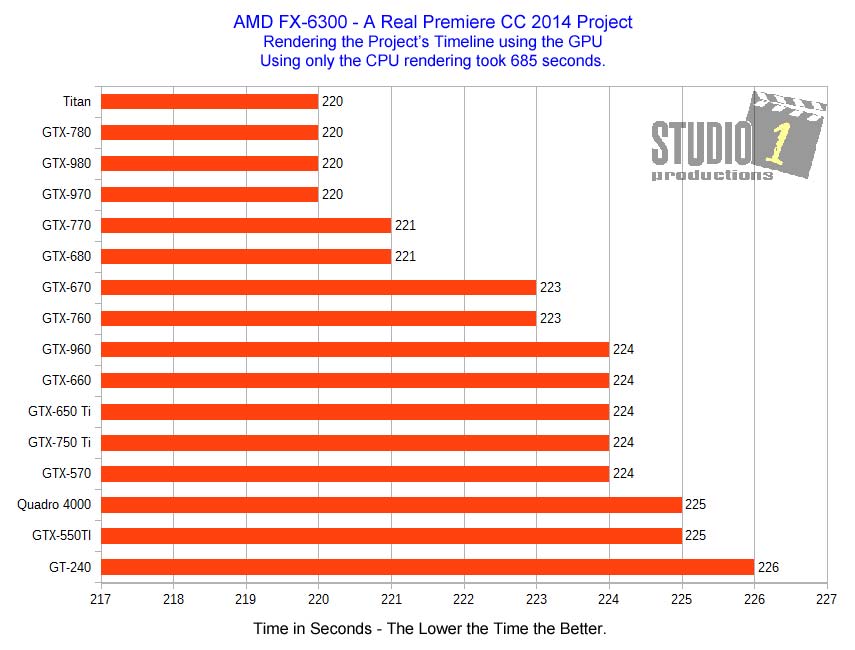
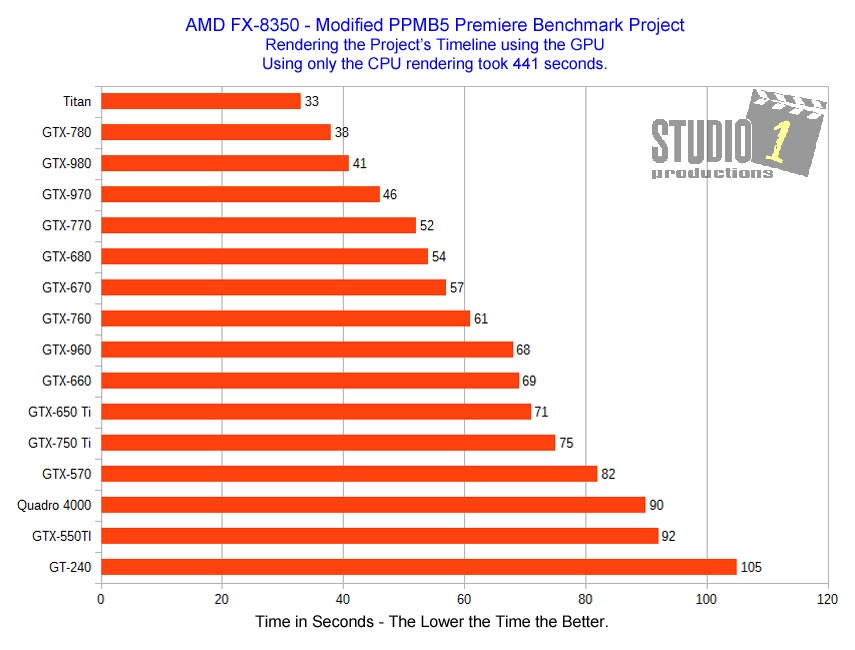
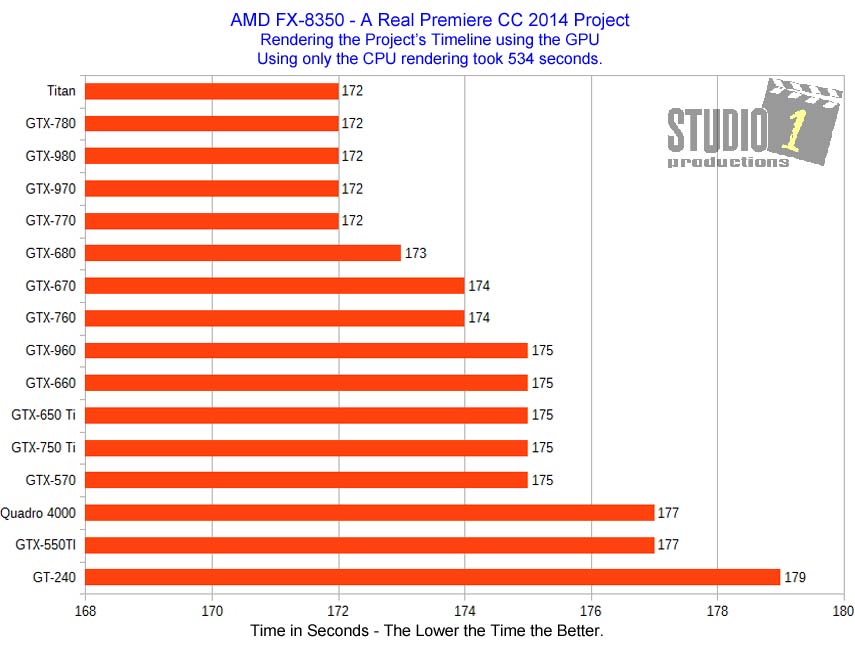
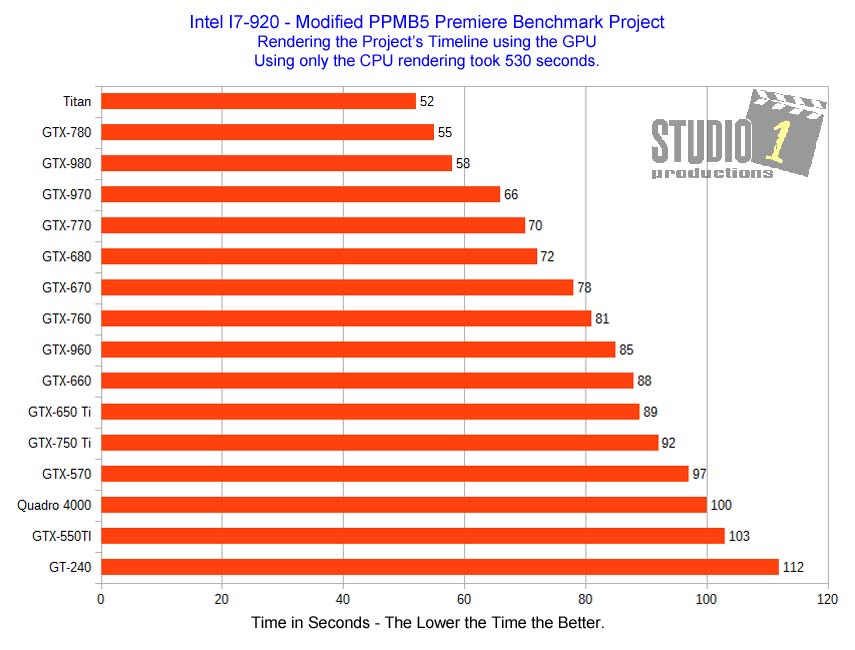
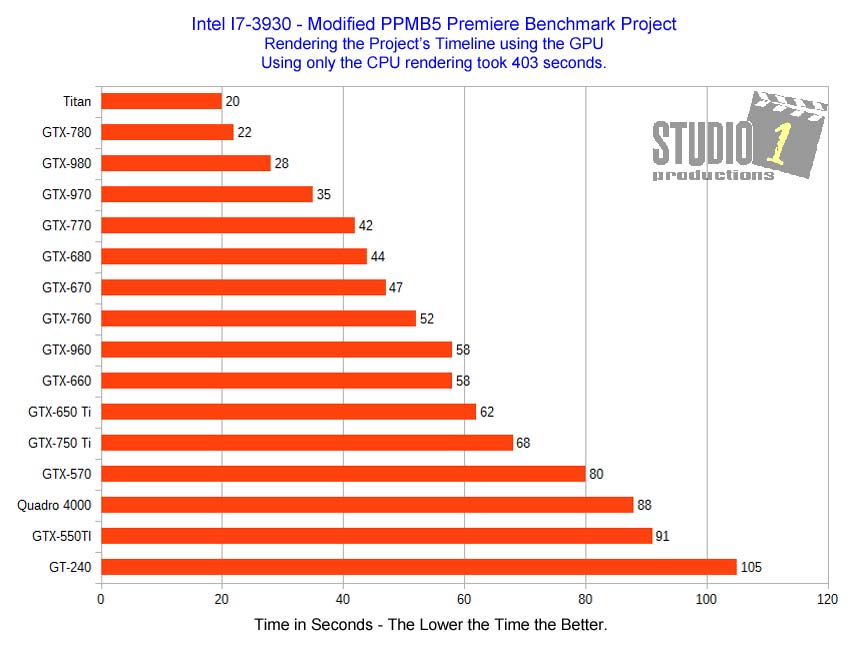
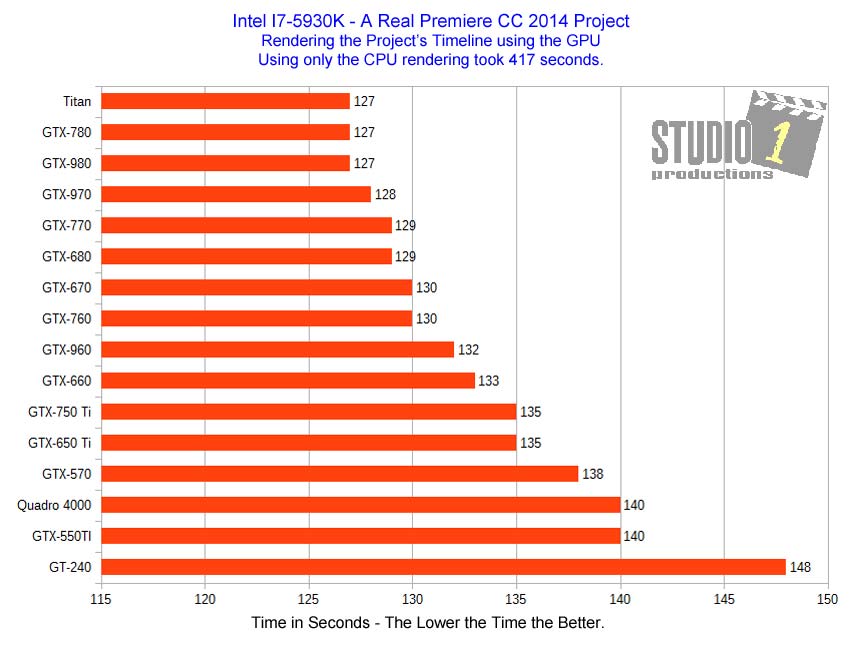
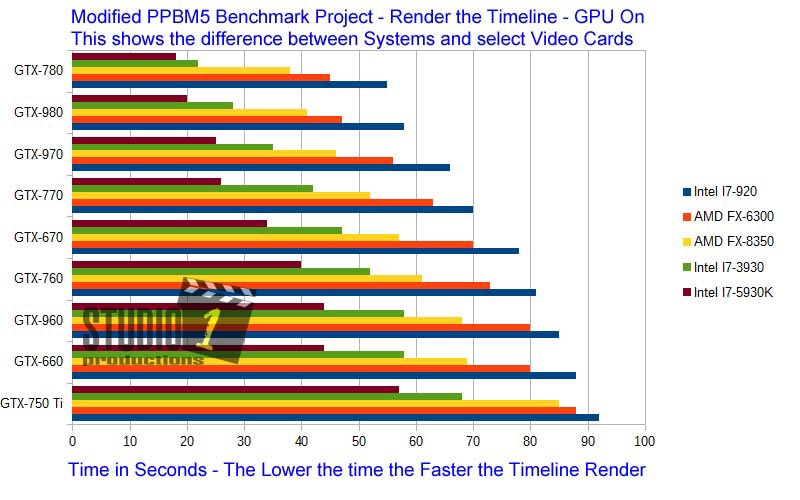
Now let's take a look at the chart above. This chart is showing you the results of using an Adobe Premiere
Benchmark Project and the results from when we rendered the timeline.
As you can clearly see, the more higher end the video card is, the better the performance.... At least when you are running the benchmark
project. But, don't get too excited yet. You need to take at look at the next chart. Using the exact same computer system, we
used the real Premiere project and rendered the timeline.
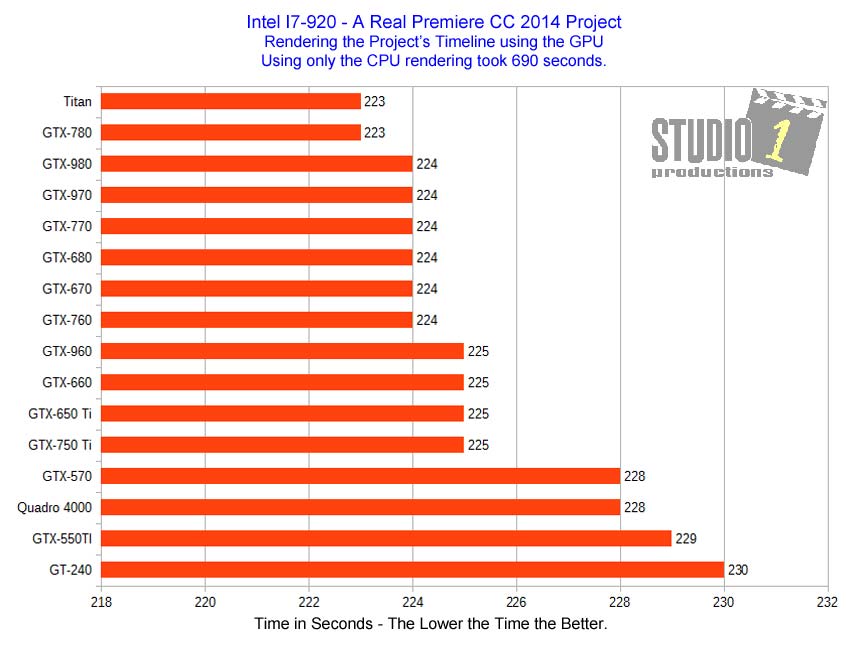
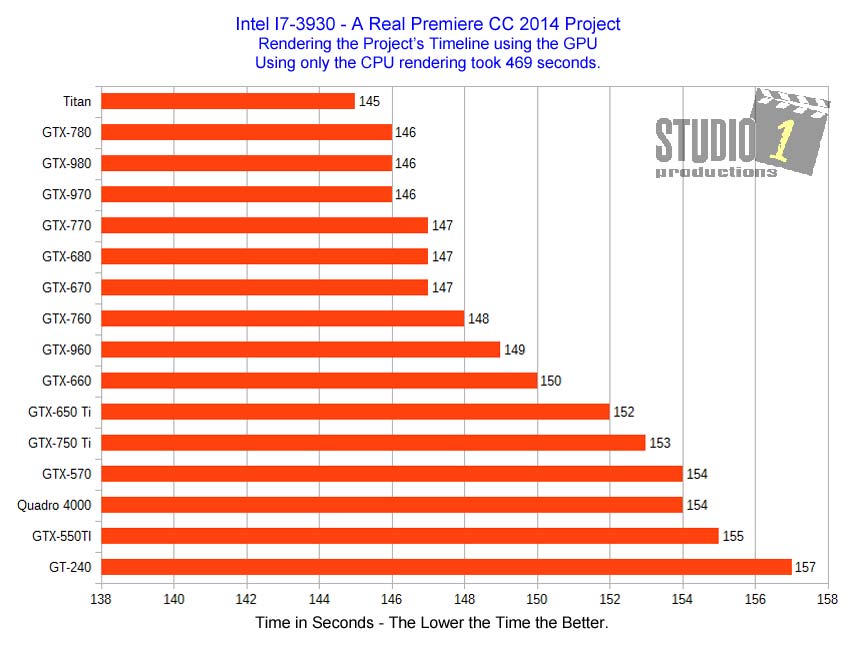
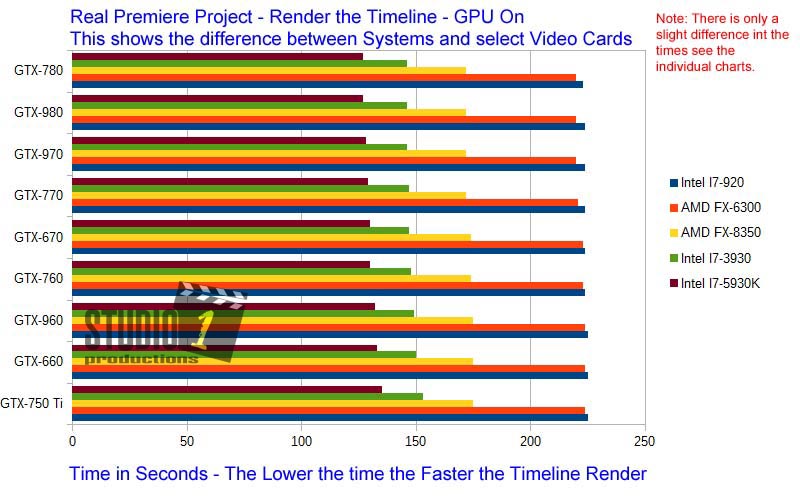
Now take a close look at the results in the chart below.
Hmmm.... What's going on here? There is hard any difference between the video cards when rendering
the timeline using a real Premiere project. The reason for this is the Premiere Benchmark is loaded with GPU effects and GPU transition.
Where as, the real Premiere project has a more normal amount of GPU effects and GPU transitions.
If you take a look at the timeline below, by looking at the yellow lines, you can see the CPU is doing most of the work, not the GPU. That is because
the GPU will only be used when it comes across a GPU effect or GPU transition when you render the timeline.
I used 5 different test computer systems, with 5 different CPU's. In the charts below, if you look at the charts with the real Premiere project and
compare just those charts, you will see how the higher the end CPU is, how it will affect the timeline render more so than the video card.
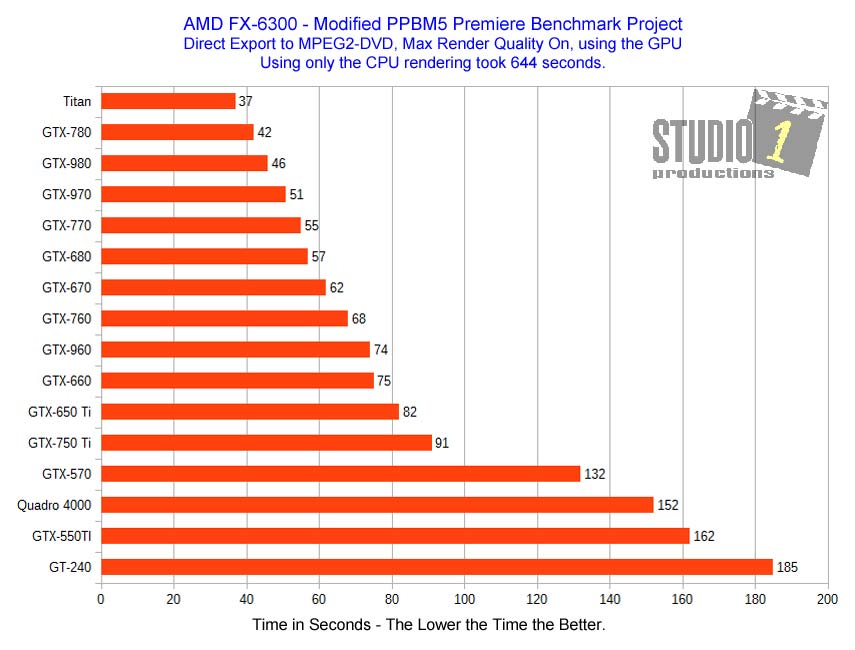
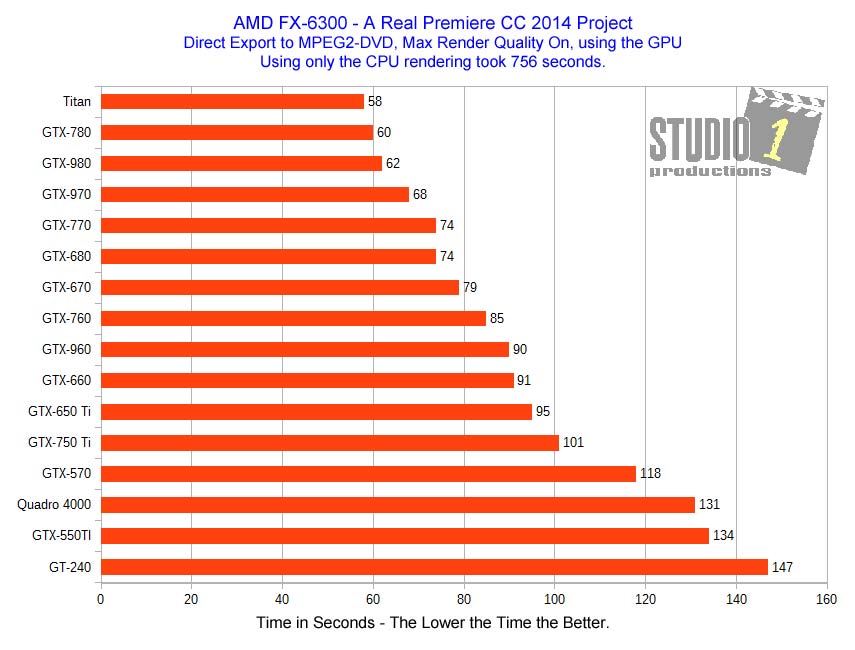
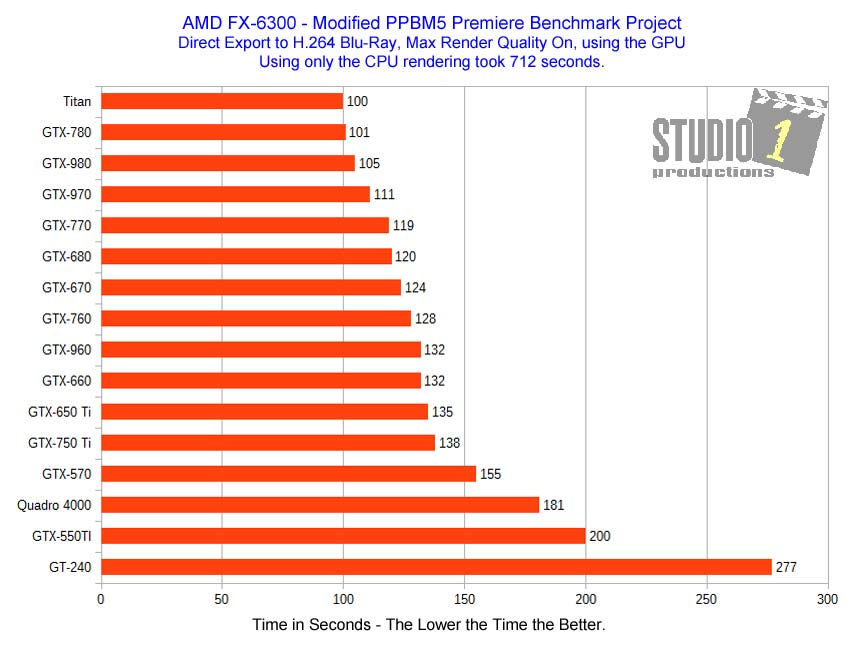
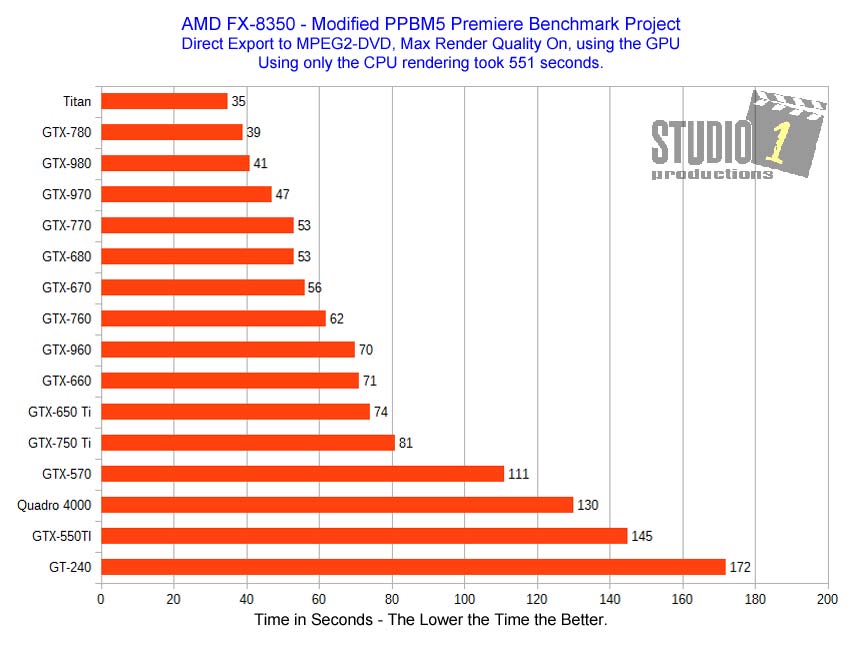
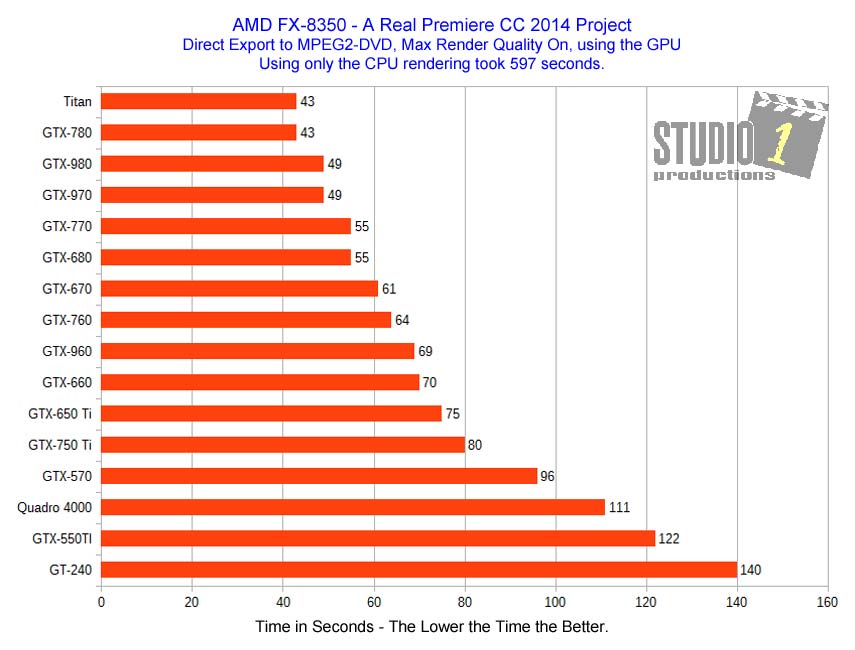
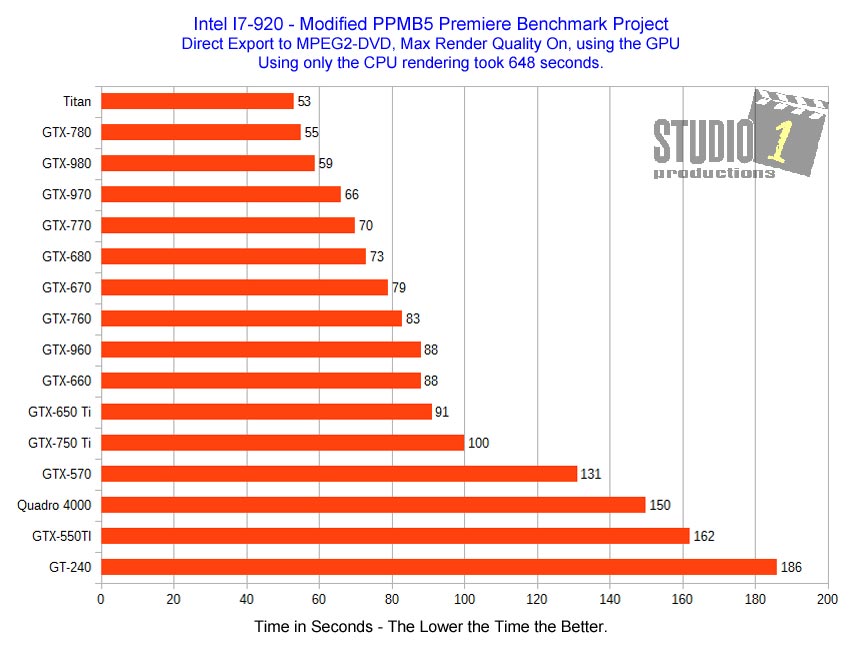
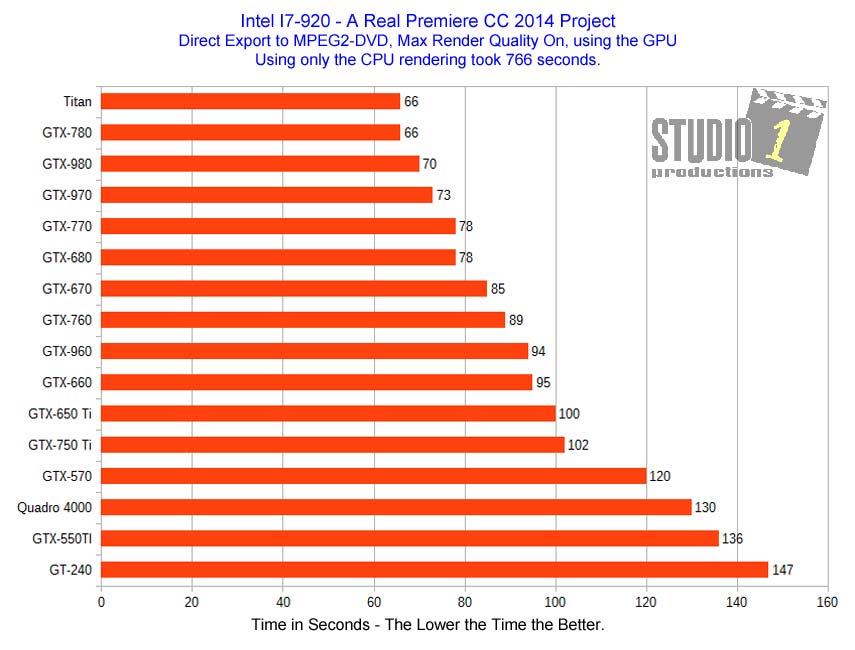
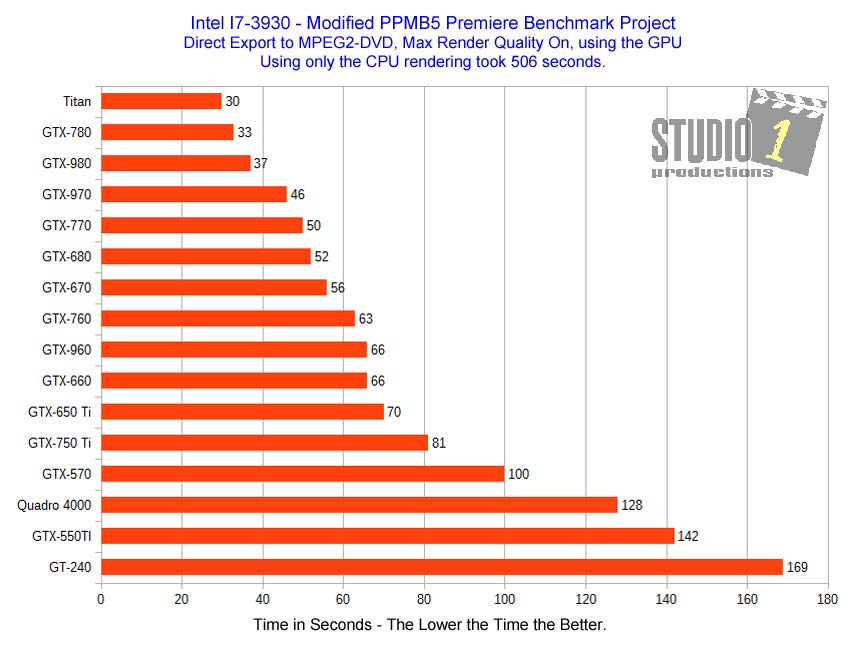
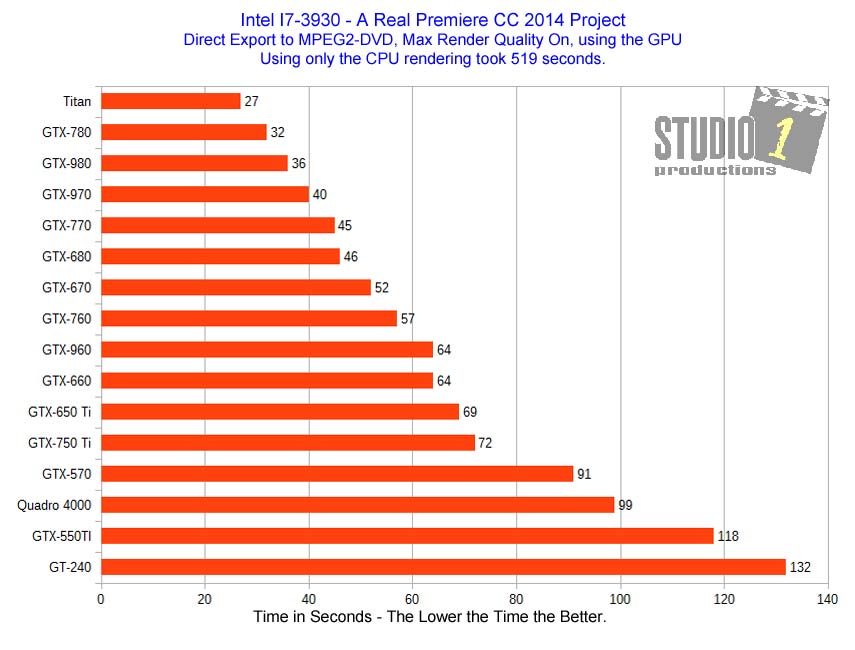
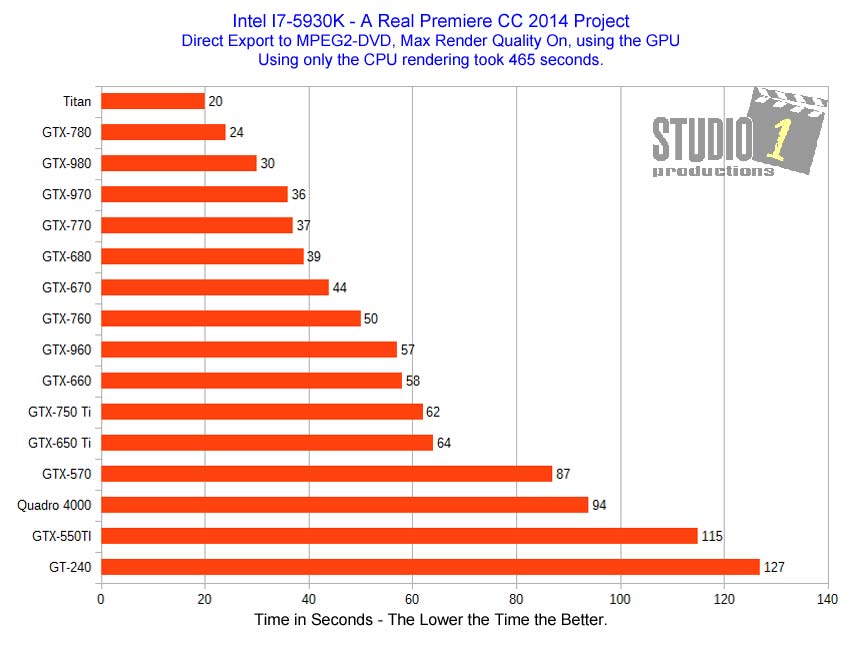
In the above 2 charts you can see that since I am downscaling from HD to an SD MPEG2-DVD format, that the GPU is being used during this
export. The reason for this is, when you are exporting your video and you are downscaling from HD to SD or from 4K to HD or SD, Premiere will use the GPU
during the downscaling. In these charts you will see how a higher end video card will help performance.
Remember, you will only see these results when downscaling.
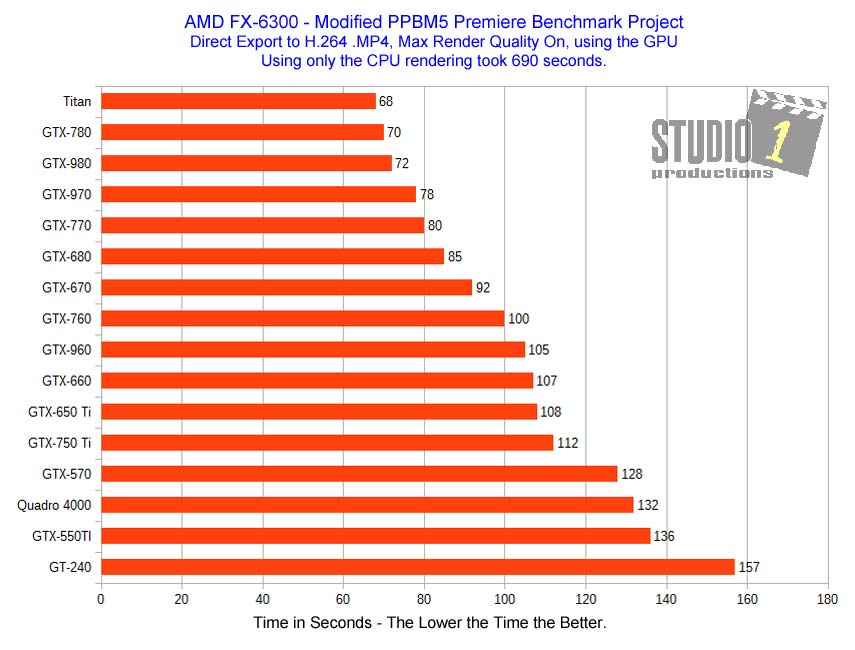
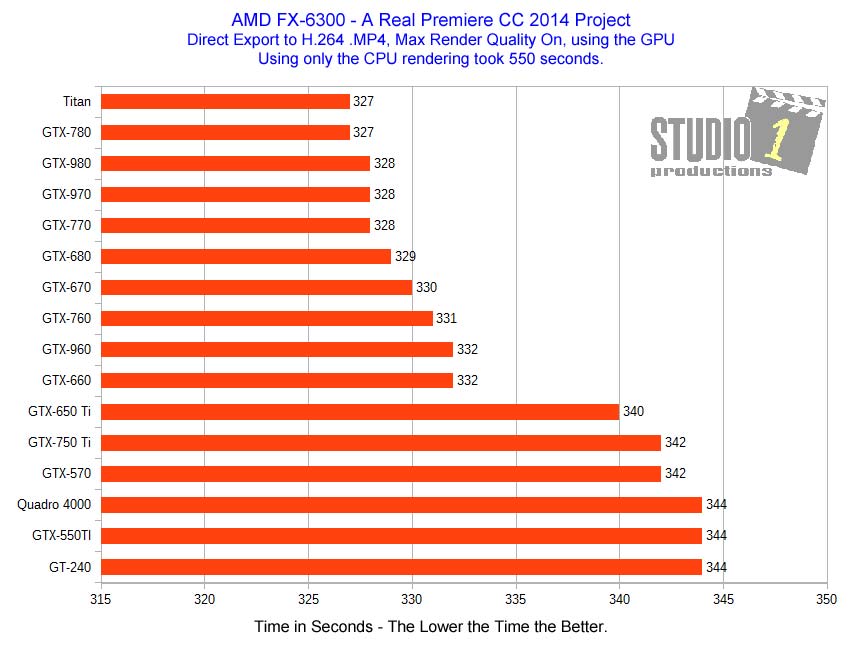
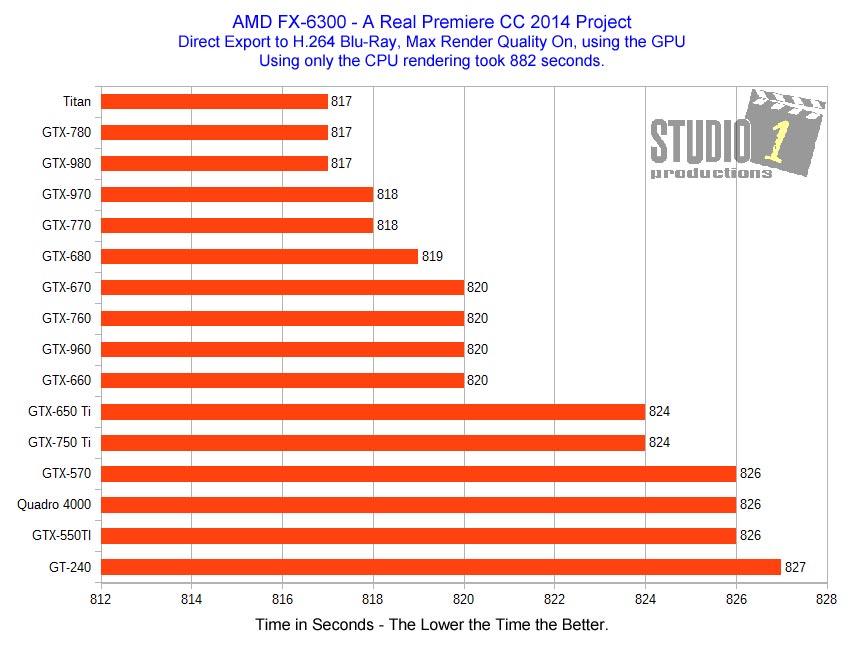
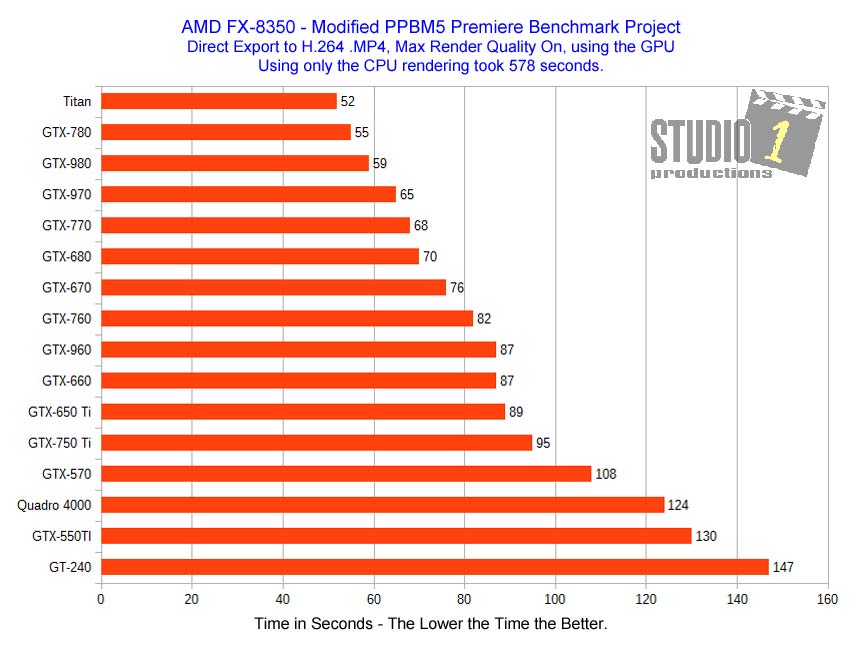
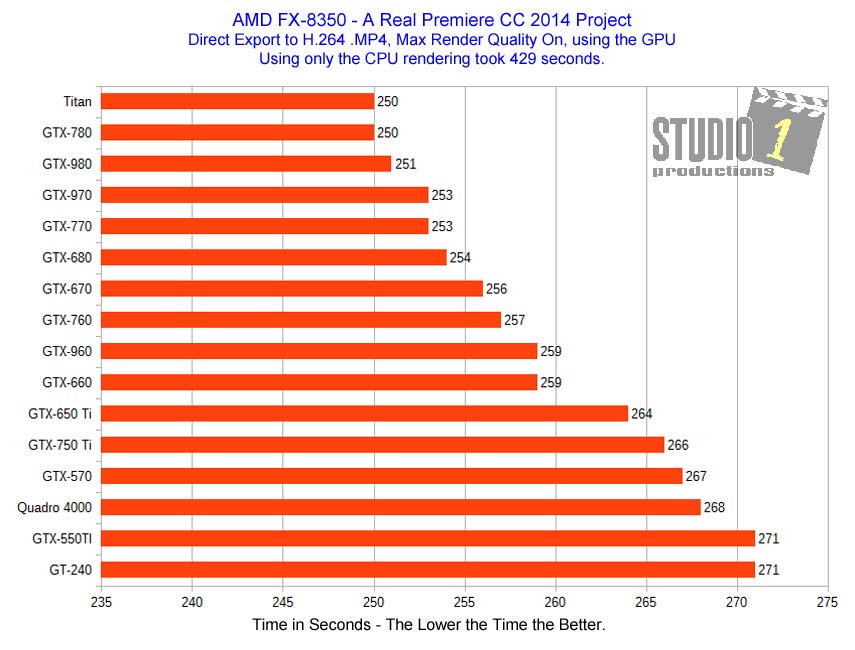
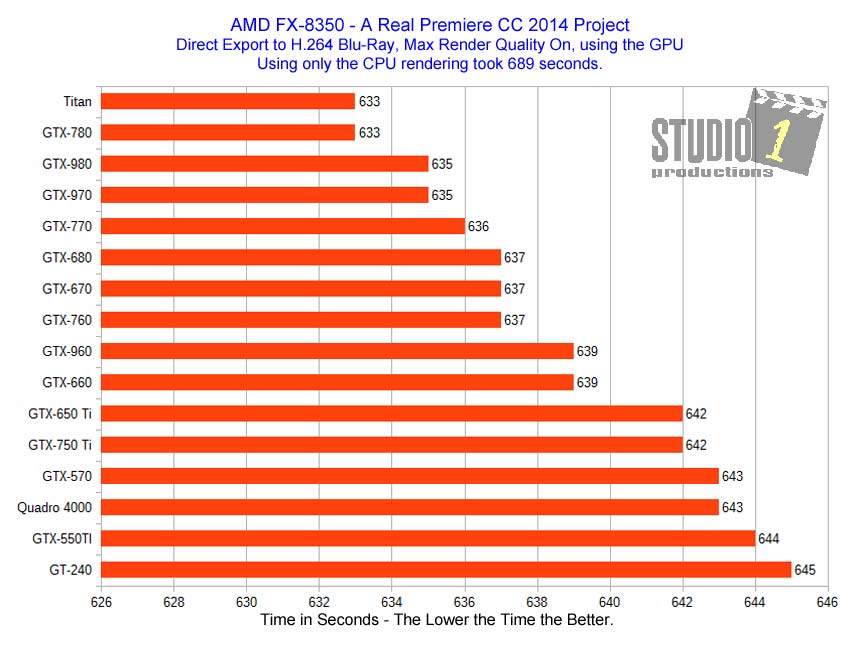
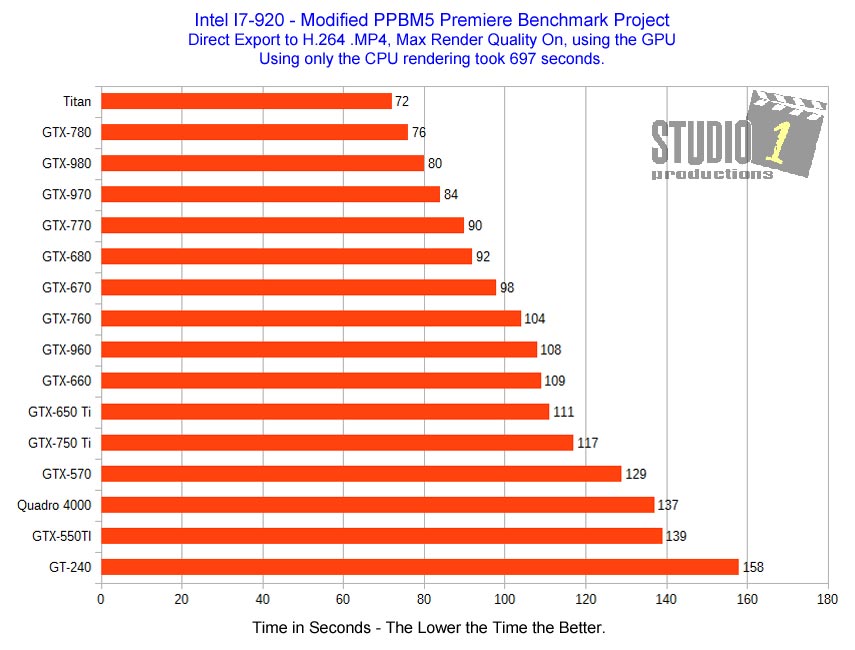
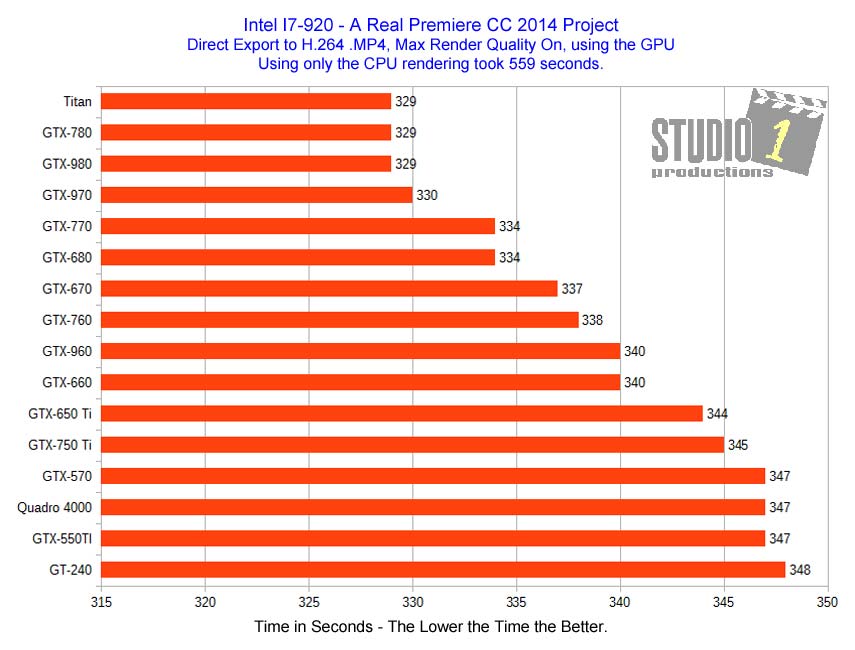
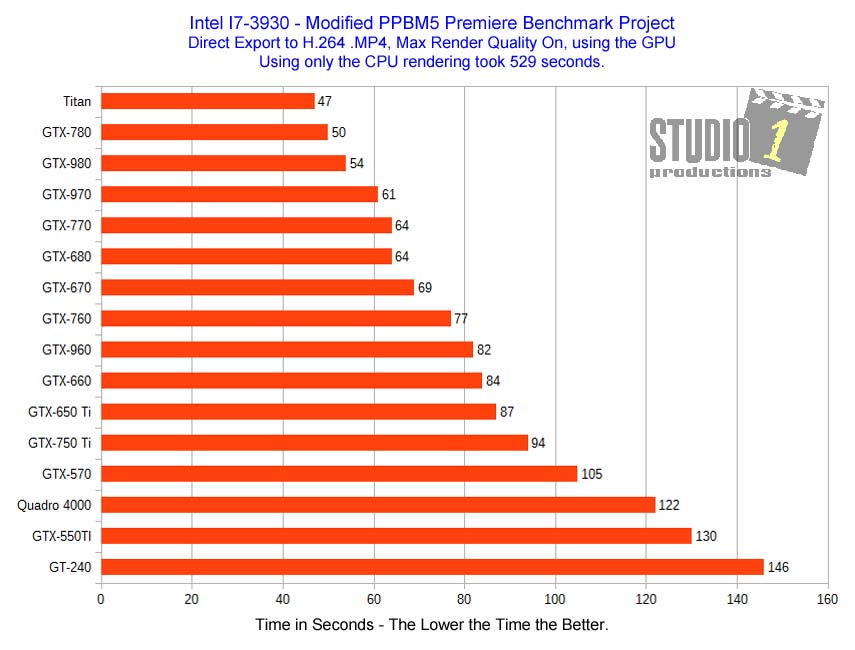
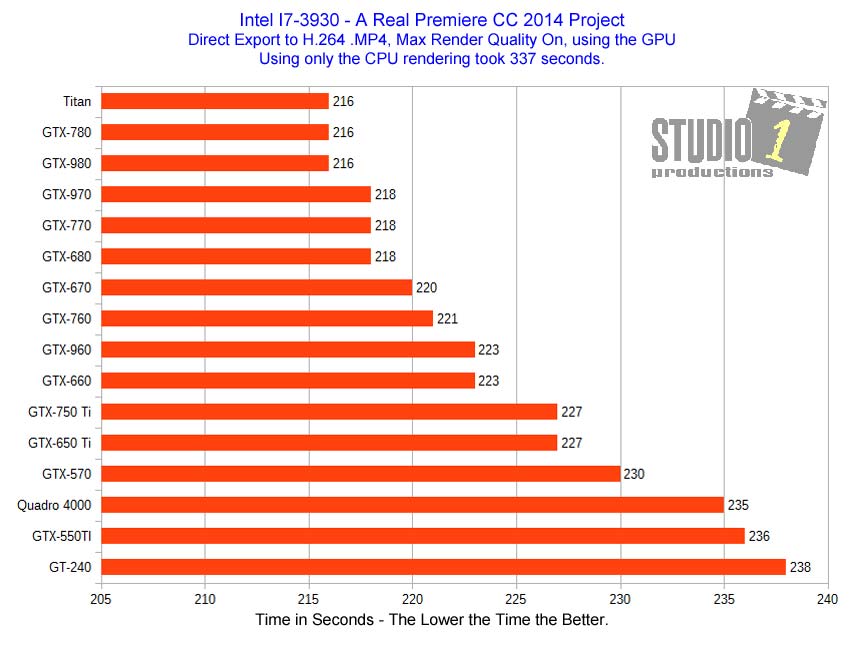
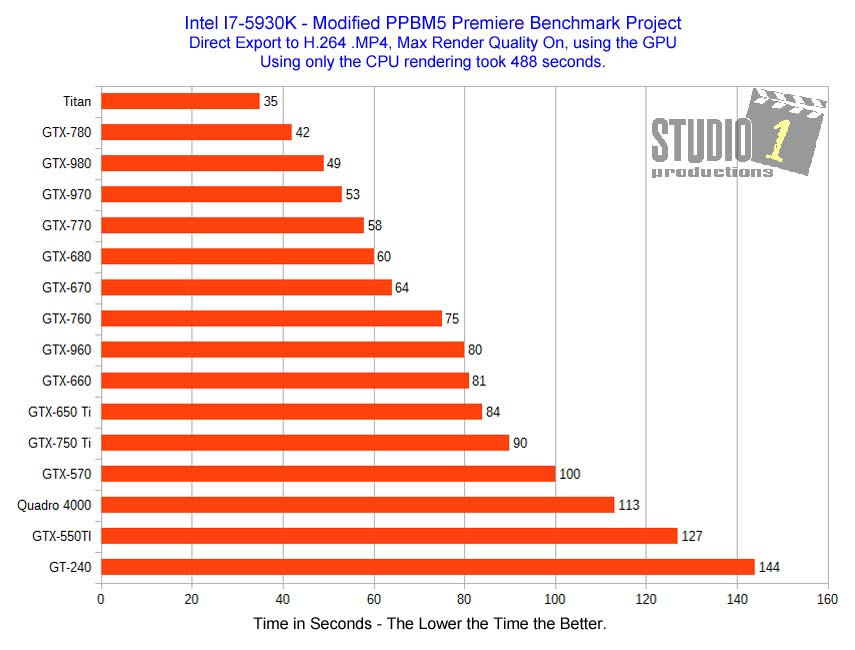
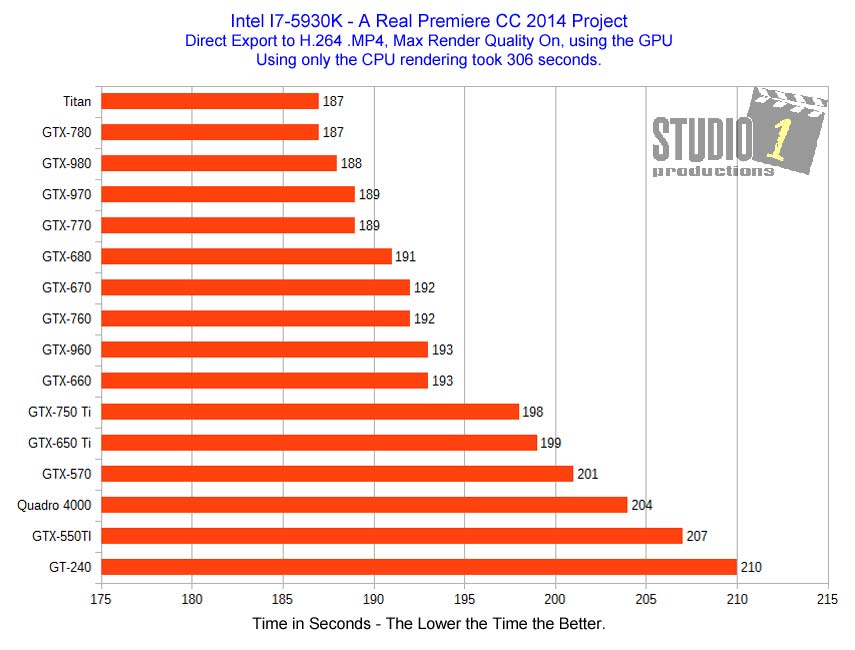
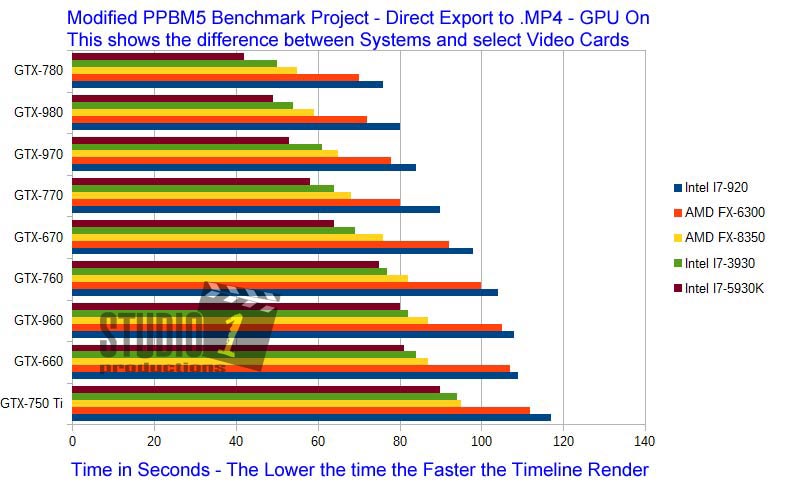
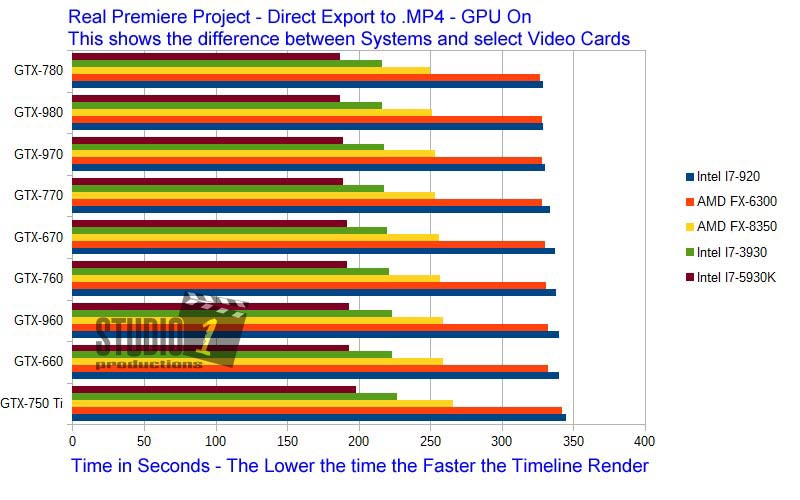
Now take a look at the 2 charts above. We are using only HD footage on our timeline and we are exporting to an HD format .mp4 video.
Since there is NO downscaling going on here, the GPU is only being used when it is coming across a GPU effect or GPU transition, just like in the timeline.
The rest of the time the CPU is doing all of the work.
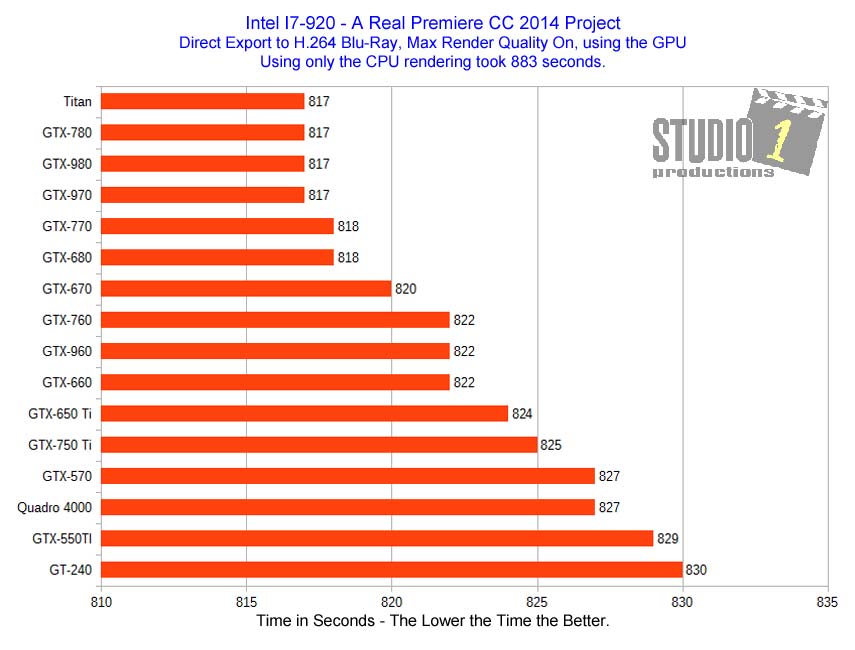
Now, since the top chart is showing you the Premiere Benchmark Project, which is loaded with GPU effects and transitions, it will not give you a real world
representation of what you can expect. The second chart, right above, is where we used the real Premiere project. As you can see the performance
gains are not even close those with the benchmark. Just remember, since the real Premiere project is using a normal amount of GPU effects and GPU
transitions, the CPU will be used a lot more.
Now that you are getting a hang of these charts, you can go through the rest of them and see the difference yourself. Just remember, with the real
Premiere project, the CPU comes into play much more than it does with the benchmark project.


About the Charts Above
As you can see with the above charts, especially with the Real Premiere Project charts, how the CPU plays a big part in the rendering
and exporting times. Remember, this is due to how many GPU effects and GPU transitions are being used in an actual Premiere project. It is
far less than the usage in the benchmark project.
Maximum GPU Load when Rendering the Timeline
Premiere Benchmark Project
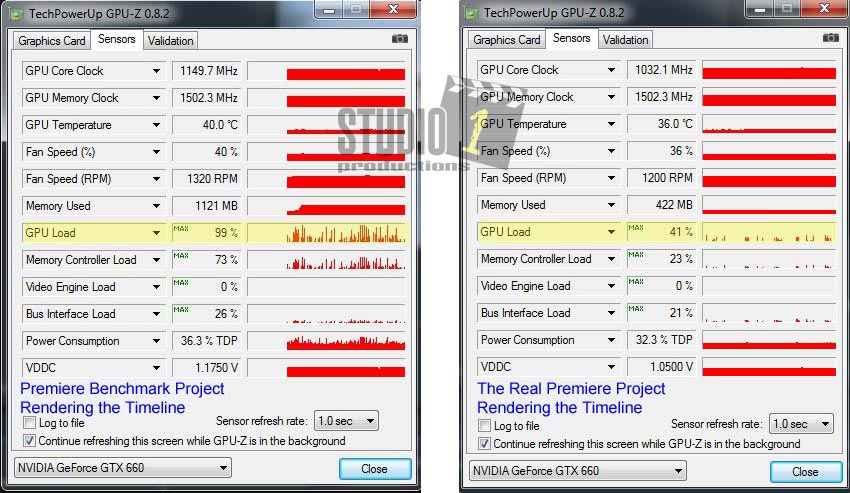
When I rendered the Timeline using the Premiere Benchmark Project and a GTX-660 video card, we were maxing out the GPU on the video card.
Also, you can see by the red spikes, that there are a lot of GPU effects and GPU transitions on the timeline.
When I rendered the Timeline on our Real Premiere Project and using a GTX-660, we never
maxed out the GPU. In fact, our maximum load was only 41%. If you look at the red spikes, they are not as high and they are not
that frequent. This is due to the Real Premiere Project having a realistic number of GPU effects and GPU transitions.
GPU Load
A good program to measure the load being put on the GPU is, GPU-Z. This is a free program you can download, that will show you information
about the GPU including GPU load. During the tests I ran, I used GPU-Z to monitor the amount of load that is being put on the GPU. Above
are two screen shots I took while I was testing the GTX-660 video card when testing the Premiere Benchmark project and the Real Premiere
project. As you can see there is quite a difference in GPU usage.
If you look under GPU load, the height of the red spikes show the amount of GPU usage at the time. While the frequency of the red spikes
show you how often the GPU is actually being used.
Below is a chart showing you the GPU load for 4 different video cards.
| Video Card |
GPU Load
Benchmark Project
Render Timeline |
GPU Load
Real Premiere Project
Render Timeline |
GPU Load
Benchmark Project
Export to .MP4 |
GPU Load
Real Premiere Project
Export to .MP4 |
GPU Load
Benchmark Project
Export to h.264 BluRay |
GPU Load
Real Premiere Project
Export to h.264 BluRay |
| GT-240 |
99% |
89% |
99% |
87% |
99% |
94% |
| GTX-650 Ti |
99% |
55% |
99% |
71% |
89% |
63% |
| GTX-660 |
99% |
41% |
98% |
39% |
71% |
53% |
| GTX-770 |
88% |
32% |
86% |
30% |
52% |
27% |
As you can see the three columns where I ran the Premiere Benchmark Project, the GPU load is very high due to the project being nothing
but GPU effects and GPU transitions. Where as the Real Premiere Project, the GPU load is much lower due to the CPU doing a lot of the work and the GPU is only
coming in to play when it comes across a GPU effect or GPU transition.
The CPU and the Real Premiere Project
When testing the Real Premiere Project and using a GTX760 video card, if you look at the charts above, you will see this video card performed better (and all
of them for that matter) as we moved up to the higher end CPU's. The reason for this is, in the real world, the CPU is going to be doing a lot of the
work. The GPU will only be there for the GPU effects and GPU transitions. (NOTE: Unless you are down scaling during your export).
Below are 4 charts that show the 5 computer systems and a select number of video cards, so you can see the how the CPU will affect the
performance. For these test I rendered the Timeline and did a Direct Export from Premiere to a h.264 .MP4 file.
Other Programs
This article was written referencing ONLY Adobe Premiere and how it works with video cards in the real work.. If you are using Video Copilot's Elements
3D, Davinci Resolve, Speedgrade, HitFilm or any other program that will maximize the GPU usage, then it is best to buy a video card based on the program
you are running that is going to maximize the GPU usage.
If you came here from the article about
Video Cards for Adobe Premiere you can simply close
this page.
To read the article
Video Cards for Adobe Premiere just click on the link.