Copyright Studio 1 Productions, 2018. Written by David Knarr of Studio 1 Productions, Inc.
Why use a Clapboard or Film Slate?
First, you use the clapboard or film slate to identify the shot you are
shooting. This will include the information for the scene, take and roll. While roll is used to identify the film roll that is in the camera, today’s filmmakers
and Videographers shooting on digital media, roll is now used to identify the digital media card or digital video tape that is being used for the shot.
By identify the each shot and by using a shot log, when it comes time to edit our video or movie, by looking at the shot log, you will know which takes were
good and which takes were not good. This will save you a lot of time while editing, as you can skip over the shots that you logged as bad shots.
Here is a Scene/Shot Log PDF file that you can download.
The second reason to use a clapperboard, is for audio and camera synchronization. For those of you who use a separate audio recorder for
capturing your audio, like a lot of DSLR filmmakers do, you will need some way to sync your audio in post productions.
This is where the clap sticks come in. When you clap the sticks together, this will give you a visual cue and a audible cue, making it easier for you to sync
up the video with the audio for each scene while you are editing.
When you are shooting with multiple cameras, when you clap the sticks, you can use the clap sound to sync up each camera for the shot. This is a big help
during post production, as it allows you to keep the video from each camera synced.
Further down in the article we will cover even more uses for the Film Clapboard
and how you can use it to make your life a little easier when it comes to post production.
Early Movie Clapboards
Early movie clapboards, as seen in the picture below, were built from a wooden chalkboard and they had a hinged clap stick mounted on the top. The early
clapboard or film slate contained only three pieces of information, which were, the Space (location) or sometimes Roll, plus the Scene and Take.
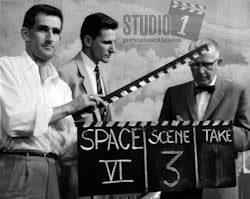
With the early film slate, everything was written on the slate with chalk, including the words Space or Roll, Scene and Take.
Since these early days the film clapboard has evolved to include much more information, as you will see further down below.
Today, the most popular kind of film slate or clapboard that are used by today’s filmmakers and Videographers are the white acrylic type. While you may still see
the older style black chalk type slates, the black clapboards with white lettering are not as popular any more. However, they are still very popular as a
decoration item.
Understand the sections of the Film Slate
Below is a photo of a modern Film Slate or Clapboard
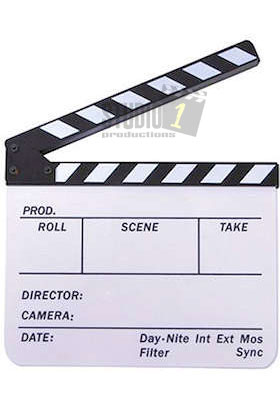
The film clapboard contains two main types of information, they are:
The Production Information
- Prod. - This is for the name of the video/movie or production.
- Director - The name of the directory
- Camera - The name of the camera man or Videographer or cinematographer.
Also, this can be used to label which camera is being used for that shot.
- Date - This for labeling the date shot was done on.
Second is the Shot Information
- Roll - This is to identify the film roll or video tape that you are using. However, with today’s filmmakers and Videographers shooting with digital media,
Roll is now being used to identify the digital media card that is being used during the shot.
- Scene - This is used to identify the scene you are shooting.
- Take- This identifies the current take. For example, Scene 1 Take 1 would mean you are shooting the first scene
for the first time. If you have to redo the shot, then it would become Scene 1 Take 2. The take will increment by one each time you have to re-shoot the scene.
On some clapboards you will see labels such as:
- Day - You circle this for a day time shot.
- Nite - You circle this for a night time shot.
- Int - You circle this for a interior shot.
- Ext - You circle this for a exterior shot.
- Mos - You circle this for a "motor only shot". I will explain this below.
- Filter - If you are using a filter on the lens, you mark that after the work filter.
- Sync - Circle this for a Sync shot. I will explain below.
Mos - This stands for Motor Only Shot. This means, that no audio will be recorded with this shot.
You will be adding audio, music or sound effects later in post production with a Mos shot. When a slate is used in a MOS take, normally
the sticks are held half open. However, you may see the film slate sticks closed.
Sync - When you circle this label, you are indicating that the clapboard is
being used to synchronize cameras with the clapping sound from the sticks on the clapboard.
As you can see the clapboard or film slate has come a long way since the early film clapboards with just Space, Scene and Take.
Let’s Take a Look at each field on the Movie Clapboard
Prod. Field
This is where you write the name or the title of the production you’re working on or at least some name for the production you are working on.
While this may be obvious, some people don’t bother with this because they are working on a small, 1 or 2 person production. Even in this situation,
I still recommend you write in the title or the name of the production, just for consistency.
If you are working on a larger production, you need to make sure everything is labeled correctly and that you don’t change the production name
part way through the project. As this could cause problems or confusion during post production.
Roll Field
If you are shooting with film, you would label each roll of tape with it’s
unique number. For example, you are shooting on roll 4, then on the film clapboard you would put the number 4 in the Roll field.
If you are shooting on tape, then you would consider each tape as a roll of film. So you would label each video tape with it’s own number and write that
number in the Roll field when you are shooting on that particular tape.
In today’s world of using digital media cards, you would consider each digital media card as a new Roll and you would label them just like you would if you
were using film or video tape.
If you are shooting with more than one camera, then assign each camera a unique letter, such as, camera A, camera B, etc.
Then in the Roll field you would label the camera letter and the media (film, tape or digital media). For example, if you are using the clapperboard with
camera B and you are on digital media card 3, you would write B-3 in the Roll field.
The purpose for doing this is to keep things organized in the post-production.
If each camera has it’s own film clapboard or film slate, then label each clapboard to correspond with the camera it is assigned to.
Scene Field
Basically, this is the scene you are shooting. Depending on the complexity of the shoot, you may only need to identify the scene itself.
However, if you are going to be trying different shots for a particular scene you will need to add more information to the Scene field.
For example, you are on scene 10 and you are going to try a couple of different shot styles. Such as a close up, wide shot and a medium shot. You would add a
letter to the scene number. For example, in the Scene field you would write:
10 - for a master shot
10-A - for a wide shot
10-B - for a medium shot
10-C - for a close up shot
10-D - for a second angle close up and so on
Sometimes you have to go back and re-shoot a scene that was thought to be completed. This can happen on the same day, the next day or even weeks and months later.
When you re-shoot a scene you re technically shooting the same scene as before, so how should you label it?
The easiest way to label a scene that is being re-shot is to put a R in front the scene number. For example, two weeks have past since you shot Scene 10-A and now you have to re-shoot it. Simply label the Scene as R10-A to signify this is
a re-shoot. Also, the take for R10-A needs to start at 1.
Take Field
Each time your start filming or recording is considered a Take for that Scene. The Take will always start at 1 and increment up from there.
Using the example from above where we had Scene 10, Scene 10-A, Scene 10-B and so on. Every time the Scene number and/or letter changes you will start the Take back at 1.
For example, you are shooting Scene 10-A, you will start the Take with number 1. Now after several Takes, you switch to Scene 10B, you would start the Take back
at number 1, since this would be considered a new Scene or a new variation to the Scene.
It is not uncommon to have many Takes for a scene as people make mistakes with their lines or dialog, or something else happens during that Take that would
require the shot be done over.
Every time a shot is repeated and you stop filming or recording, this is considered a Take. There will be times the director will just say “Don’t cut, keep rolling,
just do it once again.” Technically, you would be still on the same take, since the filming or recording did not stop.
Never reuse a Take number. It can cause you problems when it comes to editing the project.
Director Field
This is the field where you write the Director’s Name. Make sure you spell it correctly.
Camera Field
This is where you write the name of the Camera Person. Again make sure you spell their name correctly.
On smaller productions, I have seen the Camera field be used for the letter or number assigned to a camera. This would take the place of the Camera Letter being used in the Roll field.
Date Field
Here you would record the date of the shoot.
Labels you will find on some Film Clapboards
Not all film slates or clapboard will have the following labels. If your clapboard doesn’t have these, don’t worry I will show you an easy way to add the
ones you need to your clapboard.
- Day - You circle this for a day time shot.
- Nite - You circle this for a night time shot.
- Int - You circle this for a interior shot.
- Ext - You circle this for a exterior shot.
- Filter - If you are using a filter on the lens, you mark that after the work filter.
- Sync - When you are using the Film Slate or Clapboard synchronize cameras with the clapping sound from the sticks on the clapboard.
- MOS - When you are NOT recording any audio for the shot.
Below is a picture of a film clapboard that doesn’t have the labels we just covered above and one that does.
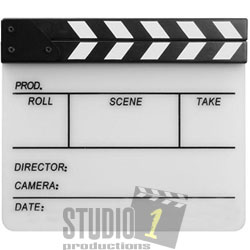
Notice the only difference between the two film clapboards is the Date area at the bottom of the film slate. Since the clapboard on the left doesn’t have the
MOS, DAY, NITE, etc. labels, you can simply write them in on the right side of the Date field as you need them.
Labeling the Clapboard
Besides writing in the name of the Production, Directory, Camera and the Date. You can always use removable vinyl letters and numbers. The ones we have
used are made by Chartpak and are called Pickett Design Vinyl Numbers/Letters Stickers, 3/4", Black. You can get them in other sized,
but the 3/4 inch ones fit the best.
For writing the Roll, Scene, Take, etc. be careful on the type of dry erase pen you use. Some will stain the Film Clapboard. We recommend
using the Vis-A-Vis wet erase pen, as they wipe clean with out leaving any staining. They can be found on our page with
the Clapboard Slates that we sell.
Conclusion
A few tips to make your life easier.
- Get use to using a film clapboard or film slate on all of you production, no matter how small or large.
- Be consistent with your labeling. It will make life much easier during post production.
- Use a shot log. This will help you immensely during post productions, as a shot
log will be your written record as to which shots were good and which one you can pass over.
A Film Clapboard is known by a variety of names, here as some of them:
Clapboard
Movie Clapboard
Film Slate
Movie Slate
Hollywood Clapboard
Production Slate
Director’s Slate or Director’s Clapboard
No matter what you call them, they are all the same thing.